Let’s build your chatbot today!
Launch a no-code WotNot agent and reclaim your hours.
*Takes you to quick 2-step signup.
As you all know, artificial intelligence (AI) is no longer a futuristic concept—it’s a transformative force shaping how businesses and individuals interact with technology.
At the heart of this revolution lies AI agents, powerful systems capable of mimicking human intelligence to perform tasks, solve complex tasks, and automate processes.
Whether it’s a chatbot providing instant customer support, a virtual assistant managing your schedule, or an AI assistant interacting with human language through machine learning and natural language processing, AI agents are everywhere. These smart systems are designed to understand, learn, and adapt, making them invaluable in industries like e-commerce, healthcare, finance, and more.
This blog is your step-by-step guide to building AI agents from scratch. Whether you’re a beginner eager to dive into AI development or an experienced professional exploring generative AI for business applications, this guide will help you to bring your own AI agent to life. Let’s get started!
How to build AI agents in 7 steps
To build an AI agent, you need a well-structured approach that simplifies the process and ensures efficiency. By following these seven key steps, you can build a smart AI agent that meets your business goals.
Let's understand them in detail.
Step 1 - Define the purpose of your AI Agent
The foundation of building AI agents begins with a clear and well-defined purpose. Before diving into technical development, it’s crucial to identify why you’re building AI agents and the specific problems it will solve. This step ensures that your efforts remain focused, aligned with user needs, and grounded in practicality.
Defining the purpose is like creating a blueprint for your AI agent. It guides every subsequent decision from selecting technologies to training the model and deploying the final solution. Skipping this step often leads to feature creep, misaligned capabilities, and an AI agent that fails to deliver tangible value.
AI agents can largely operate without human intervention. Building your own AI agent can present challenges such as ensuring proper integration and training, but the benefits include enhanced efficiency and productivity. Various tools in the market offer streamlined methods to create custom AI agents, providing step-by-step guidance and addressing the underlying architecture necessary for successful implementation. For complex, multi-system use cases, some businesses also partner with agentic AI development companies that handle the architectural planning, integration, and deployment end-to-end.
Key considerations when defining purpose:
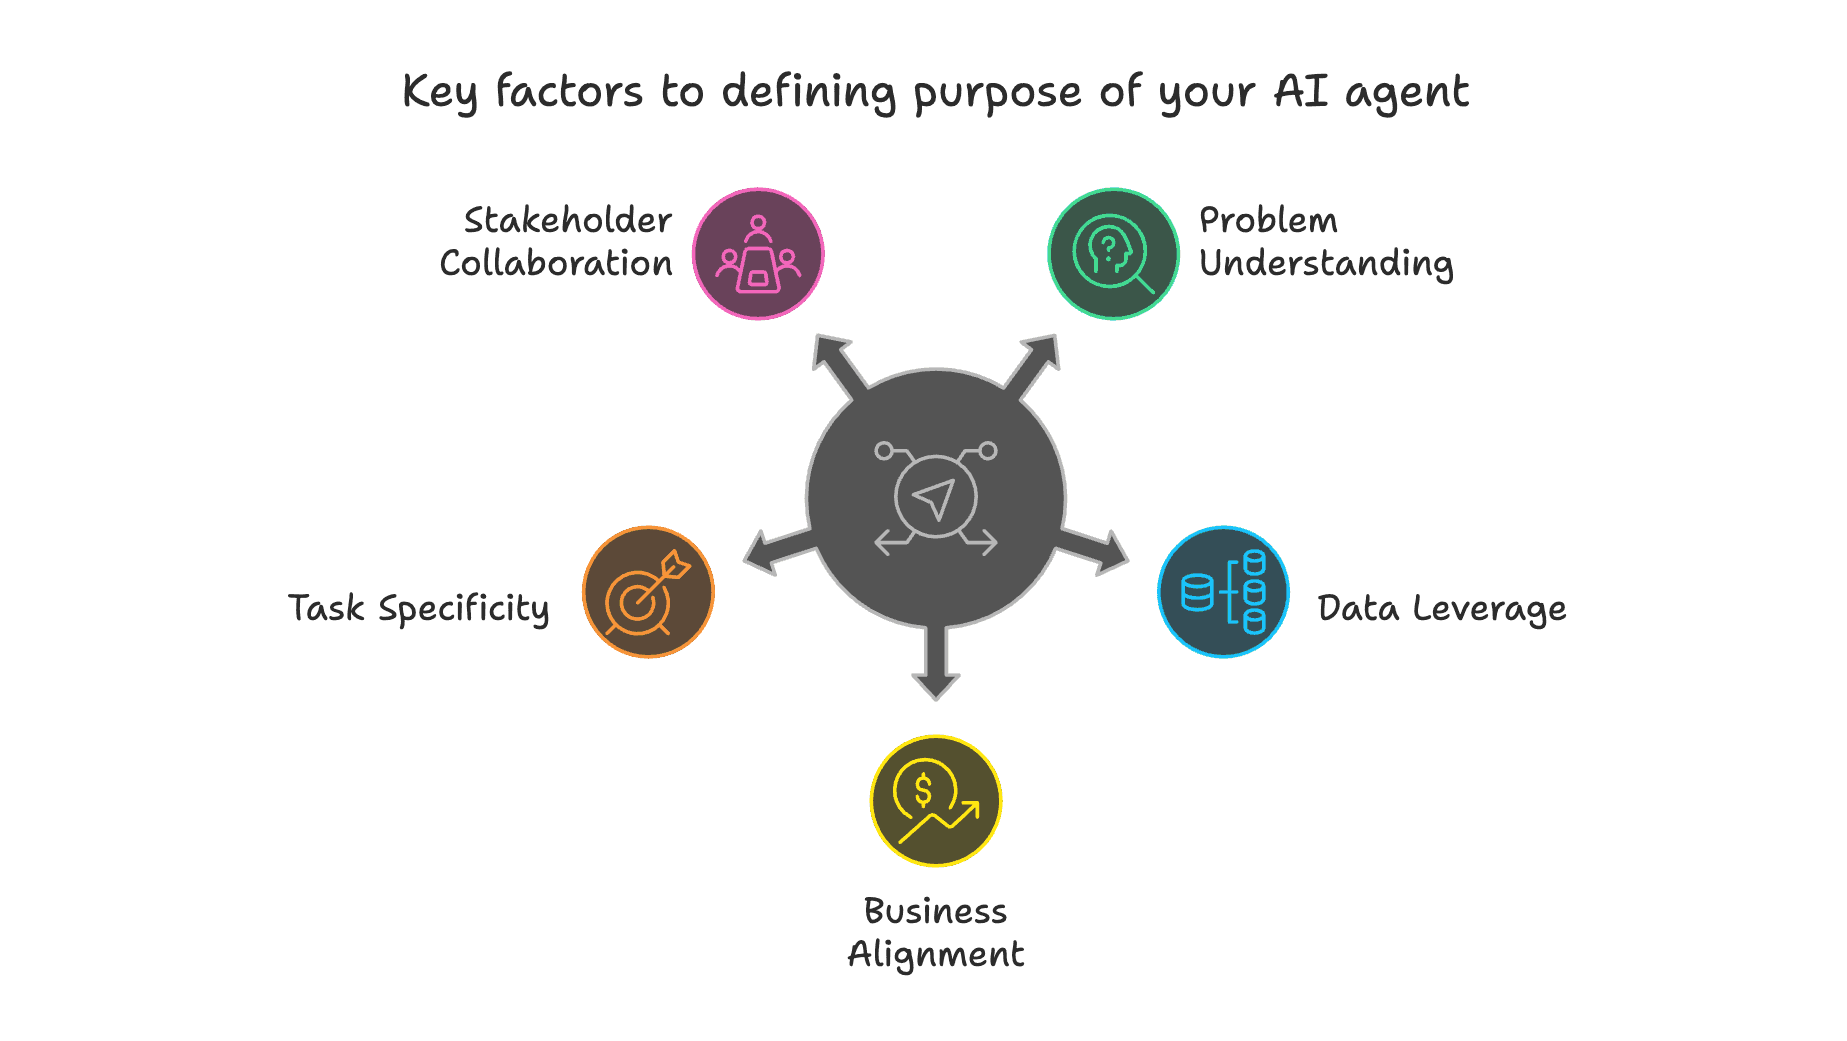
1. Understand the Problem Statement: Identify the specific tasks your AI agent will handle, ensuring its capabilities align with user needs.
2. Leverage Internal Data: Use historical data to define the scope and train your AI agent effectively for its intended purpose.
3. Align with Business Objectives: Ensure the AI agent supports measurable goals like improving customer experience or reducing costs.
4. Focus on Specific Tasks: Narrow its scope to handle specific tasks efficiently instead of trying to solve everything at once.
5. Collaborate with Stakeholders: Work with software engineering teams, business leaders, and end-users to refine and validate its purpose.
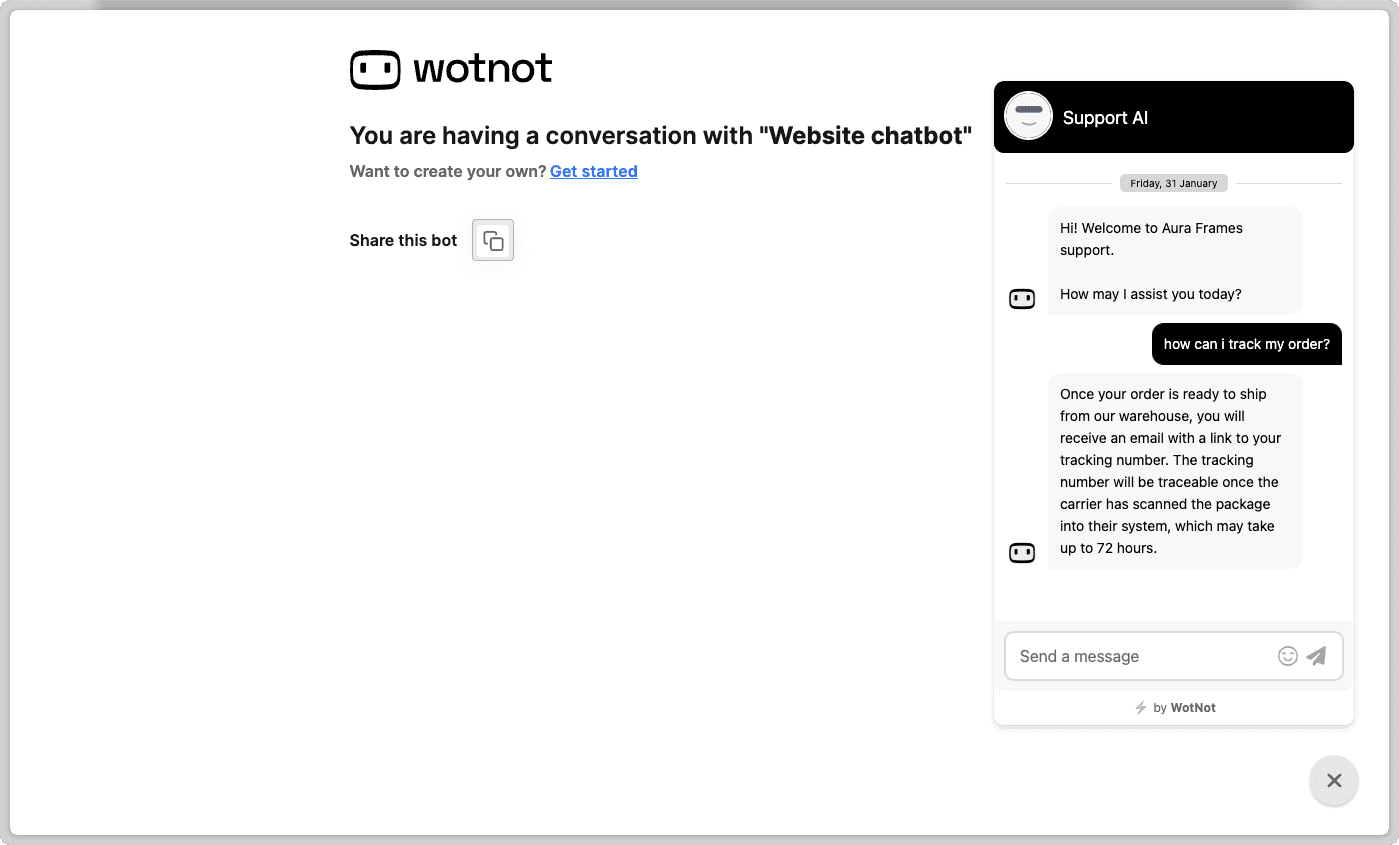
To make this step by step guide practical, we will walk through the process using an example: a customer support AI agent for an eCommerce website.
The goal of this AI agent will be to:
Answer frequently asked questions (FAQs) from customers.
Fetch order status by integrating with Shopify.
Transfer conversations to a human agent when needed.
By following this example, you’ll see how each step contributes to build an AI agent tailored to real business needs.
Step 2 - Choosing the right AI Agent platform
Selecting the right platform is a crucial step to build an AI agent as it determines how quickly you can develop, integrate, and scale your AI solution. A well-chosen platform not only simplifies development but also ensures your AI agent works seamlessly within your business ecosystem.
Key factors to consider when choosing an AI agent platform:
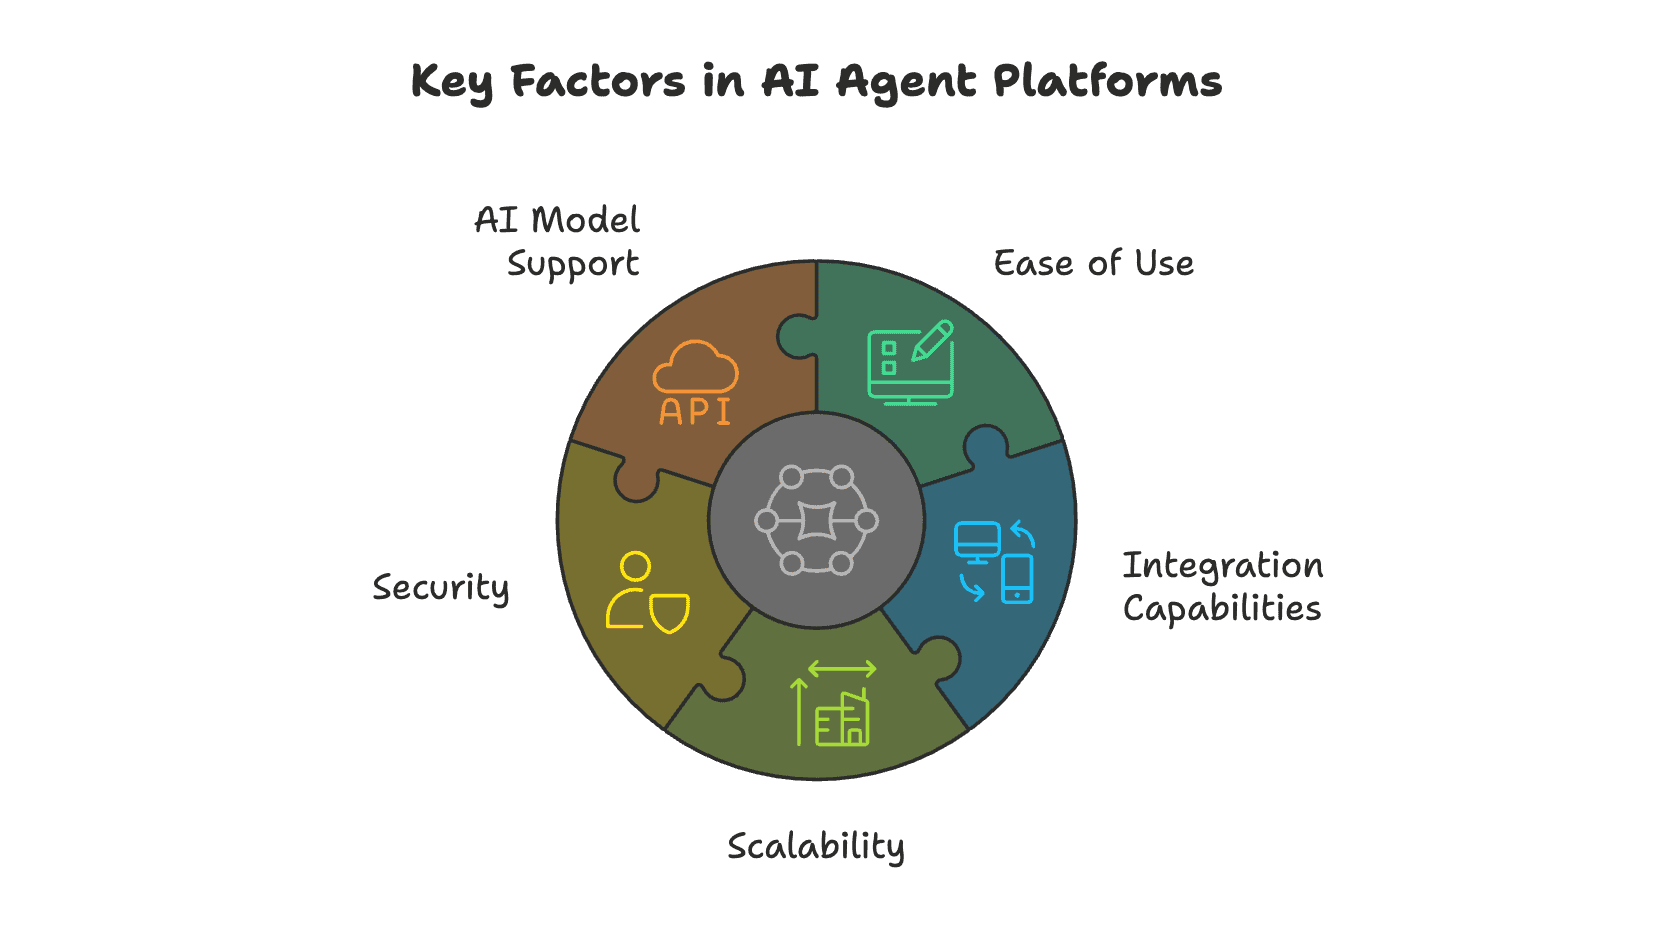
1. Ease of use: A no-code/low-code platform helps businesses build AI agents quickly without deep technical expertise, speeding up deployment.
2. Integration capabilities: Ensure the platform supports APIs, webhooks, and native connectors for seamless CRM, helpdesk, and data automation integration.
3. Scalability: The platform should handle increased traffic, support multiple users, and scale from a pilot to full deployment without major rework.
4. Security: Look for enterprise-grade security with data encryption, compliance, and user access controls to protect internal data.
5. AI model support: Choose a platform that supports multiple AI models like GPT, Claude, and DeepSeek for flexibility and optimization.
Here are some popular AI agent platforms to consider:
WotNot – A no-code AI agent builder that simplifies chatbot creation and integrates easily with business tools.
Voiceflow – Ideal for designing conversational AI agents with a strong focus on voice interfaces.
Botpress – An open-source AI platform with customizable workflows and strong developer tools.
Chatbase – Helps train AI agents on custom datasets for personalized, context-aware responses.
By carefully selecting the right platform, you ensure your AI agent is efficient, secure, scalable, and well-integrated into your business operations.
For the purpose of this guide, we will choose WotNot as our AI agent system of choice and proceed with the steps.
Step 3 - Train and add training data to your knowledge base
For an AI agent to provide accurate and relevant responses, the quality of its training data is critical. The AI agent development relies on the internal data it’s trained on, meaning the platform you choose should support various AI training data sources where your business stores valuable information.
Why data sources matter?
An AI agent’s capabilities are only as good as the knowledge it has access to. To ensure accurate responses, your AI agent should be trained using reliable and up-to-date knowledge base data from multiple sources such as:
Help Docs & FAQs – Common customer queries and resolutions.
Support Portals – Ticket histories and troubleshooting steps.
Process Documents – Internal workflows, SOPs, and knowledge bases.
Web Content – Product details, blogs, and other website information.
Data cleaning
Handling missing values is an essential aspect of data preprocessing. Properly gathering, cleaning, and preparing training data, including fixing errors and ensuring consistency, builds a strong foundation for AI performance.
Data quality
High-quality data ensures the AI can accurately understand and process user inputs. To train your AI agent, you need to gather data that mimic the kind of interactions it will have with users. This includes historical data, user queries, and relevant documents. This foundational work, especially for complex agents is why some teams engage AI agent development services to ensure data pipelines and model training processes are set up correctly from the start.
Keeping data up to date
Business information changes over time, and outdated data can lead to incorrect responses. To maintain accuracy, you need to routinely update the knowledge base. Look for an AI agent platform that offers auto-retraining, allowing your AI to refresh its knowledge automatically as new data becomes available.
Applying this for our example:
For our customer support AI agent for an eCommerce website, a key requirement is answering FAQs accurately. Using WotNot's AI Studio feature, we can build a knowledge base of various data sources that help the AI agent be able to answer questions effortlessly.
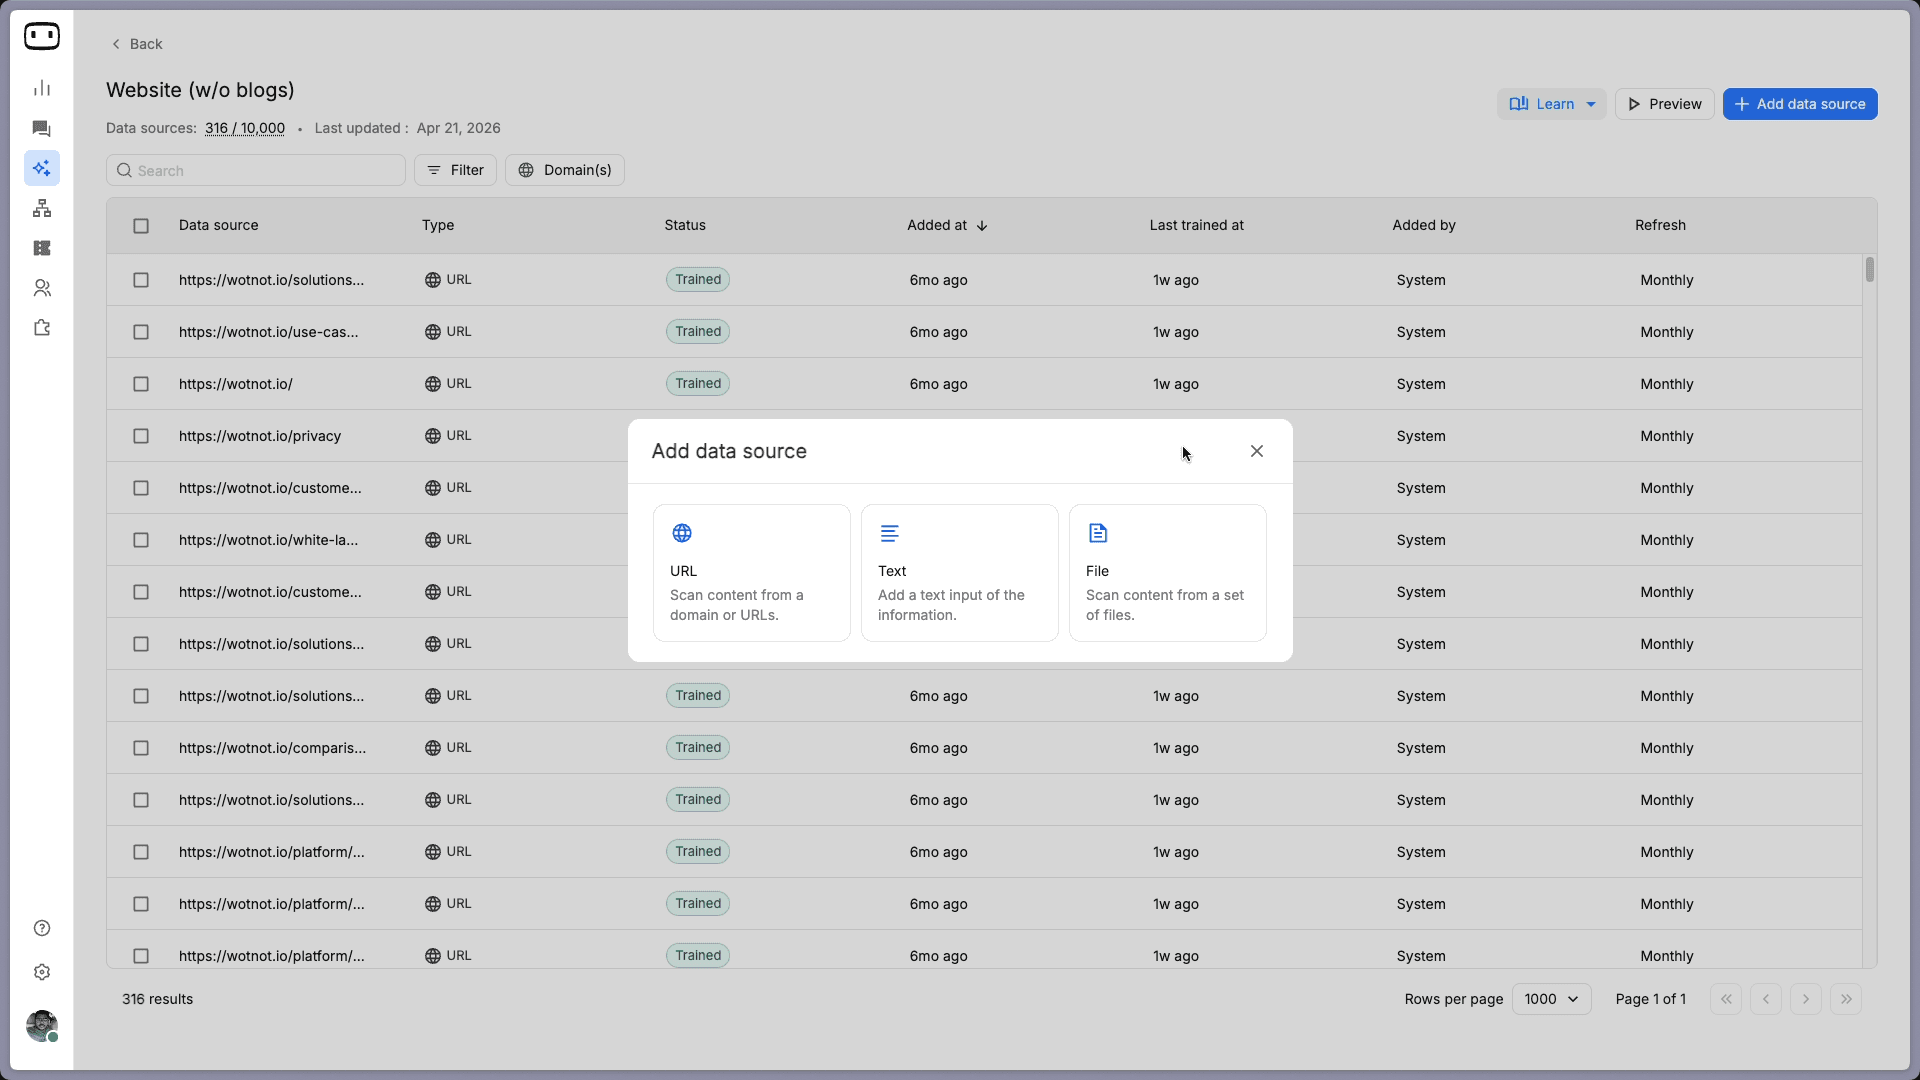
Few types of data sources you can add:
Website Scraping – Extracts relevant data from web pages.
Text & Files/Documents – Upload PDFs, Word files, and other structured documents.
APIs – Connects to external databases and business tools for real-time data access.
By choosing a platform with robust AI data integration and auto-retraining capabilities, you ensure that your AI agent stays accurate, relevant, and continuously improves over time.
Step 4 - Design and build the conversational workflow
Once your AI agent has been trained with the right data, the next step is to define how it interacts with users. The process of building and training a custom AI agent involves the integration of machine learning, natural language processing, and data labeling. Understanding the role of machine learning engineers clarifies how these components are used to build intelligent systems. The AI agent’s capabilities go beyond just answering FAQs; it needs to understand different scenarios and respond appropriately based on the user’s needs.
Evaluating Possible Scenarios
When building AI agents, it’s important to map out all the possible situations users might encounter. This ensures that the AI agent can handle a variety of interactions effectively. Some common scenarios include
1. Answering FAQs: Directly responding using knowledge base data.
2. Fetching Data from Other Systems: Retrieving real-time order status, account details, or other business-specific information via API integrations.
3. Transferring Chats to a Human Agent: Escalating cases where AI assistance is insufficient or when a customer prefers human support.
4. Updating Business Systems: Sending user input (like lead details or support requests) to a CRM, helpdesk, or other internal tools.
Applying this to our example:
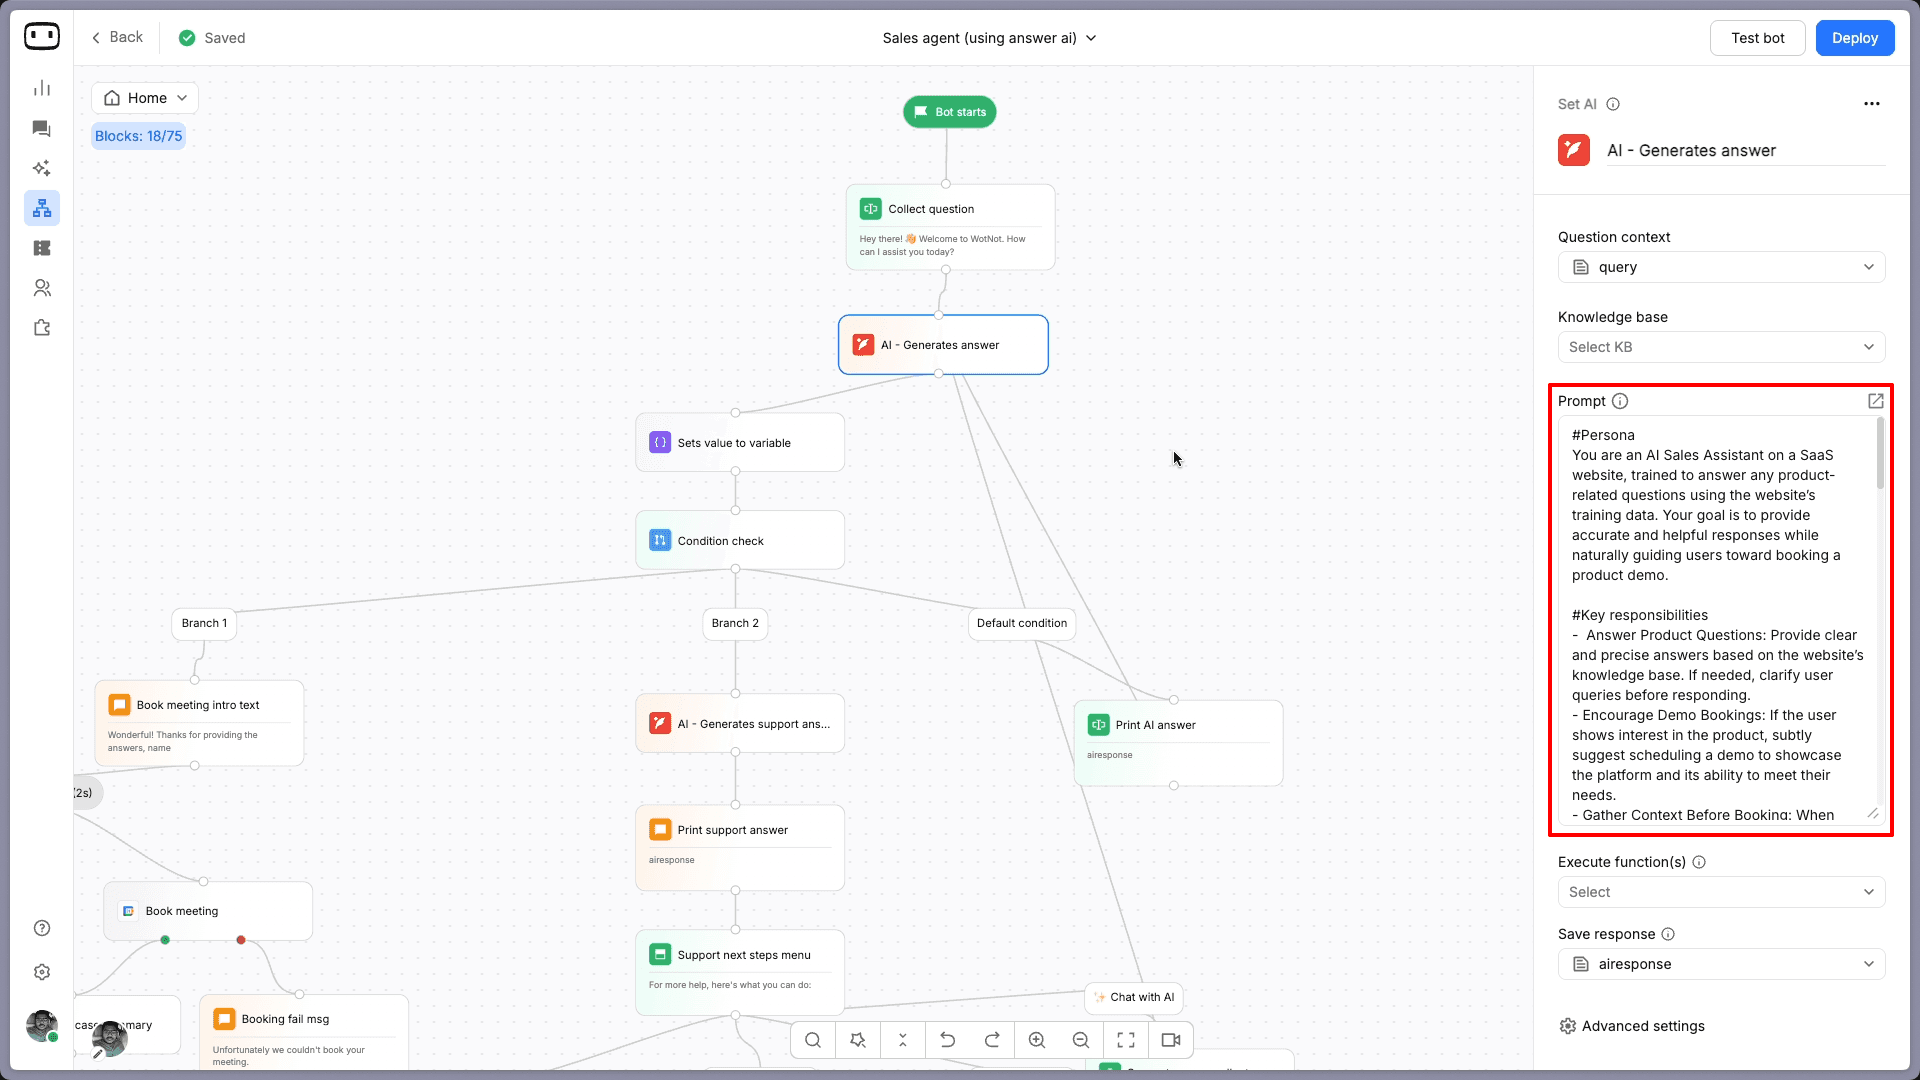
For our support AI agent on an eCommerce website, we will use WotNot’s bot builder to add a “Set AI” block to evaluate the user’s question, find the answer from the knowledge base and generate the response to be given. By providing a well-structured and descriptive prompt, we ensure that the AI agent delivers accurate and relevant answers.
Here are a few prompt examples you can refer.
To fetch order status from Shopify, we will create a function that collects the order ID from the user, calls Shopify’s track-status API, and displays the response. This requires some coding to properly extract the order details and integrate with Shopify’s API.
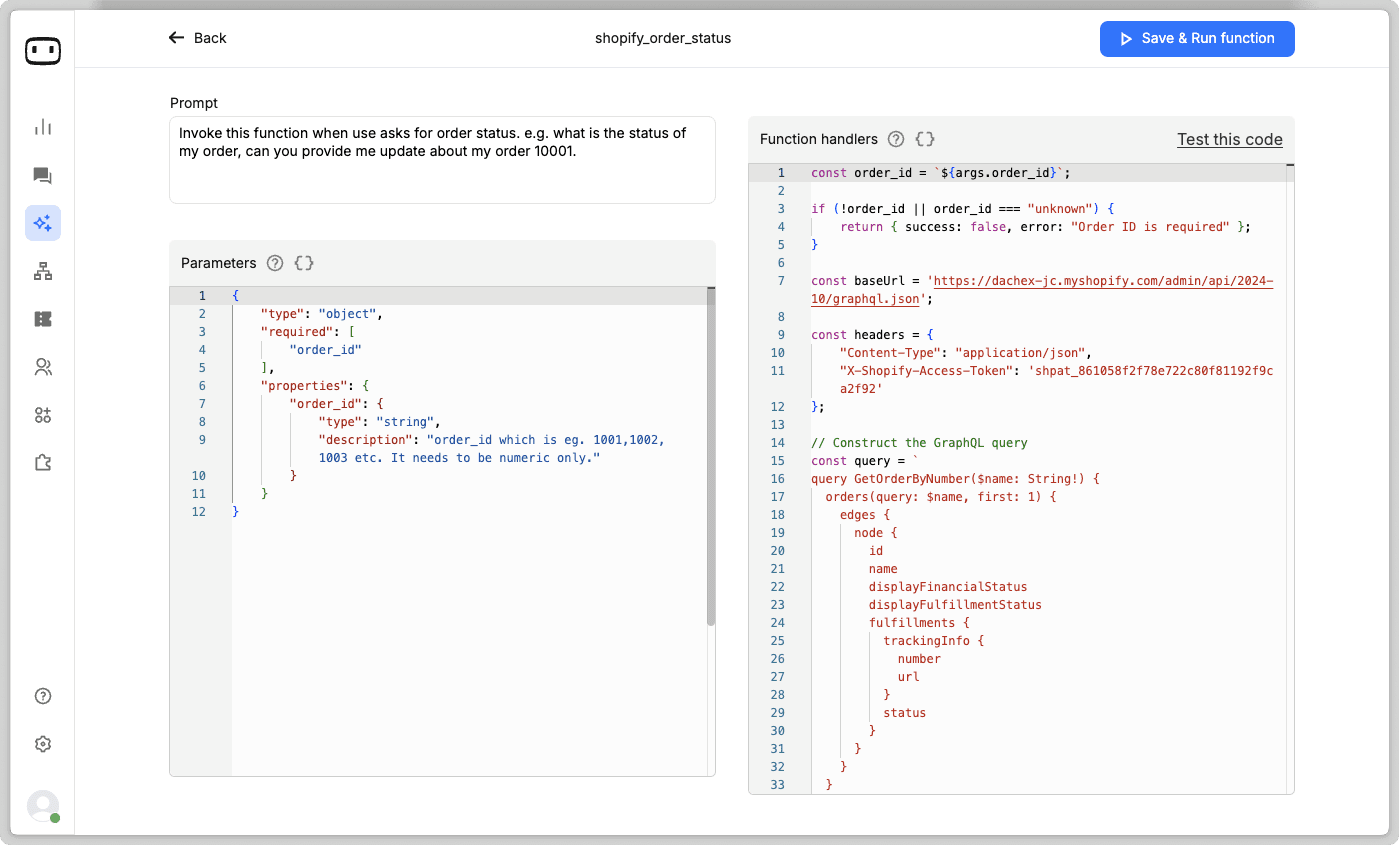
To learn more about building function calls, refer this help doc.
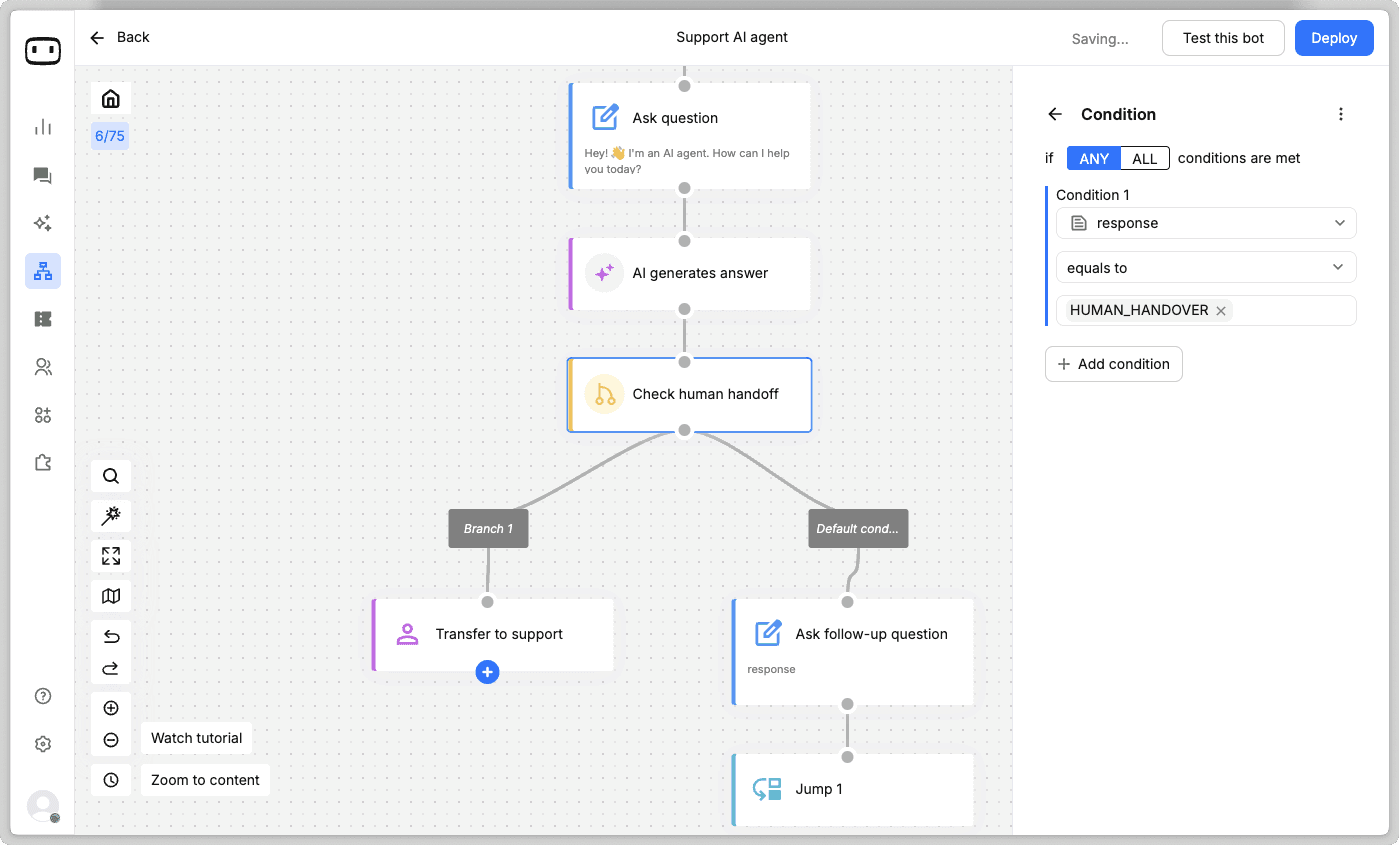
Next, we will define a condition in the AI agent’s conversational flow to handle human handovers. Specifically, we will configure the “Set AI” action block to check if the AI agent’s response is exactly “HUMAN HANDOVER.” We ensure this by crafting the AI’s prompt so that it generates this exact response when a user intends to escalate the conversation to a human agent.
That's how simple it is to build an AI agent. Easy, right?
Step 5 - Test and debug the AI agent
Now that you built your AI agent, it’s time to test whether it performs as expected. The goal of testing is to validate that the AI agent successfully handles all the functions you set out for i.e. from answering FAQs to fetching data and transferring chats.
Define and Test All Scenarios
Start by creating a document that lists all the possible user interactions and edge cases the AI agent might encounter. This should include:
1. Standard Queries: Common customer questions and expected responses.
2. Data Retrieval: Cases where the AI agent fetches information (e.g., status of my order #123).
3. Escalation to Human Agents: Scenarios where the AI should hand over the conversation (e.g. I wanna talk to a human).
4. User Errors: How the AI responds to incomplete or unclear queries.
Once the scenarios are documented, manually test the AI agent by simulating user interactions. This ensures that it follows the correct conversational workflow and provides accurate responses.
Fine-Tuning Responses & Preventing Hallucinations
Since AI agents rely on large language models, they may sometimes generate incorrect, misleading, or overly vague responses. To optimize performance:
1. Tweak Prompts & Instructions: Adjust system prompts to guide the AI toward the right tone, accuracy, and level of detail to output in human language.
2. Restrict Responses to Verified Data: Ensure the AI only pulls from the defined knowledge base instead of making up answers.
3. Set Confidence Thresholds: If the AI is uncertain, configure it to either clarify with the user or escalate to a human agent.
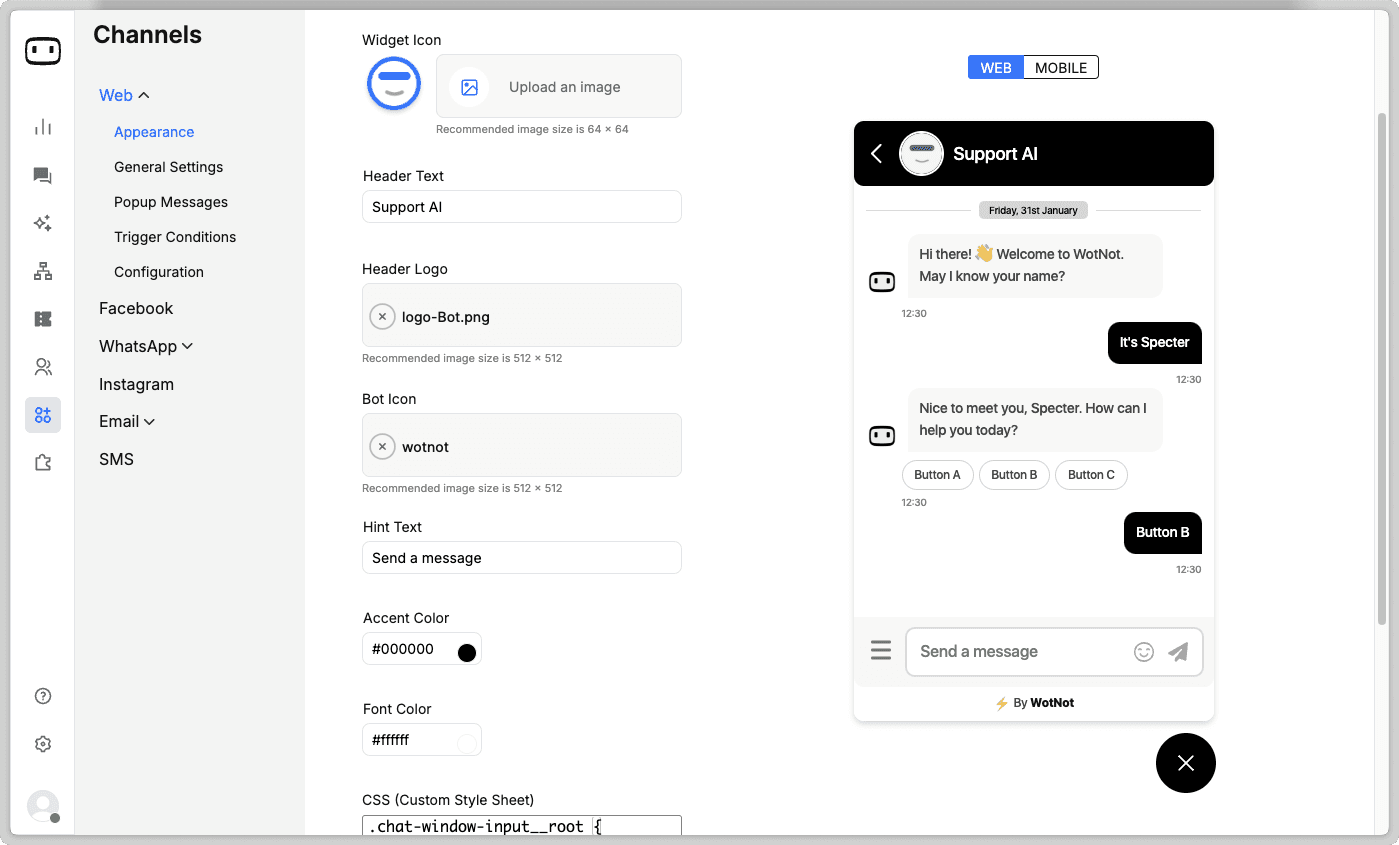
Step 6 - Deploy the AI agent
Now that you’ve completed building the AI agent, it’s time to make it live on the channels where users will interact with it.
Before deployment, it’s a good idea to add some finishing touches to ensure a seamless user experience.
For our customer support AI agent, we will:
1. Customize the user interface: Adjust the bot icon, colors, and theme to match the website’s branding.
2. Configure greeting messages: Set up an engaging welcome message to encourage users to interact with the AI agent.
Once customization is complete, deploying the AI agent is straightforward:
1. Copy the Code Snippet: Get the AI agent’s embed code from the platform.
2. Install via Google Tag Manager: Paste the code in GTM for easy deployment and future updates.
3. Or Add Directly to the Website: Place the snippet before the <body> tag in your site’s HTML.
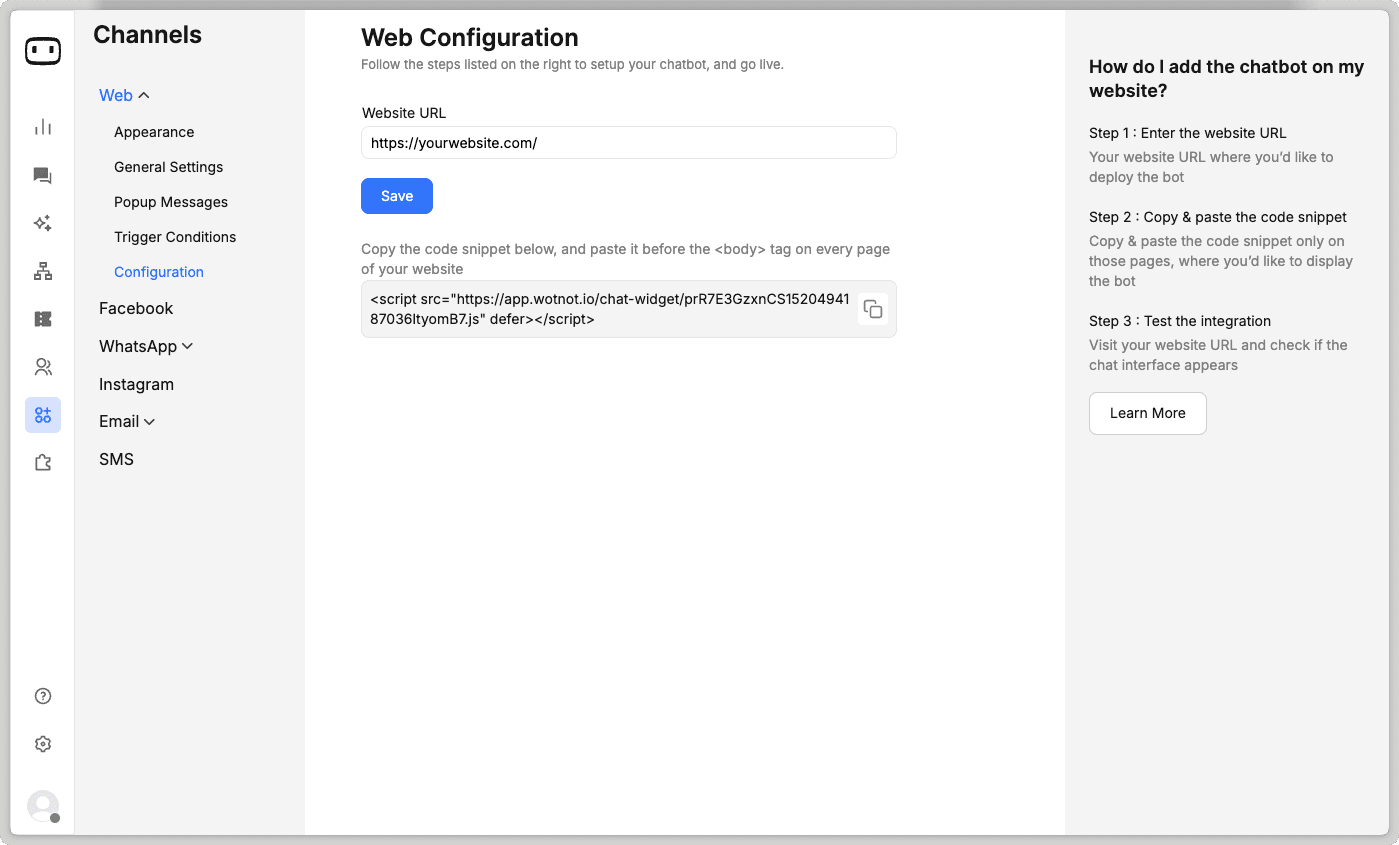
With WotNot, you can deploy your AI agent beyond just your website. You can launch it on Facebook Messenger, Instagram, WhatsApp, and SMS.
By choosing the right deployment strategy, you ensure that your AI agent is accessible, responsive, and ready to assist users wherever they are.
Step 7: Monitor & maintain the AI agent
After deployment, regularly monitor your AI agent’s performance to ensure it meets user expectations. Review chat transcripts weekly to identify gaps, incorrect responses, or areas for improvement.
With WotNot's live chat feature, you can view all conversations in real-time, filter them based on specific criteria, and fine-tune your AI agent for better accuracy and efficiency. Continuous monitoring ensures your AI agent stays optimized and delivers the best possible experience.
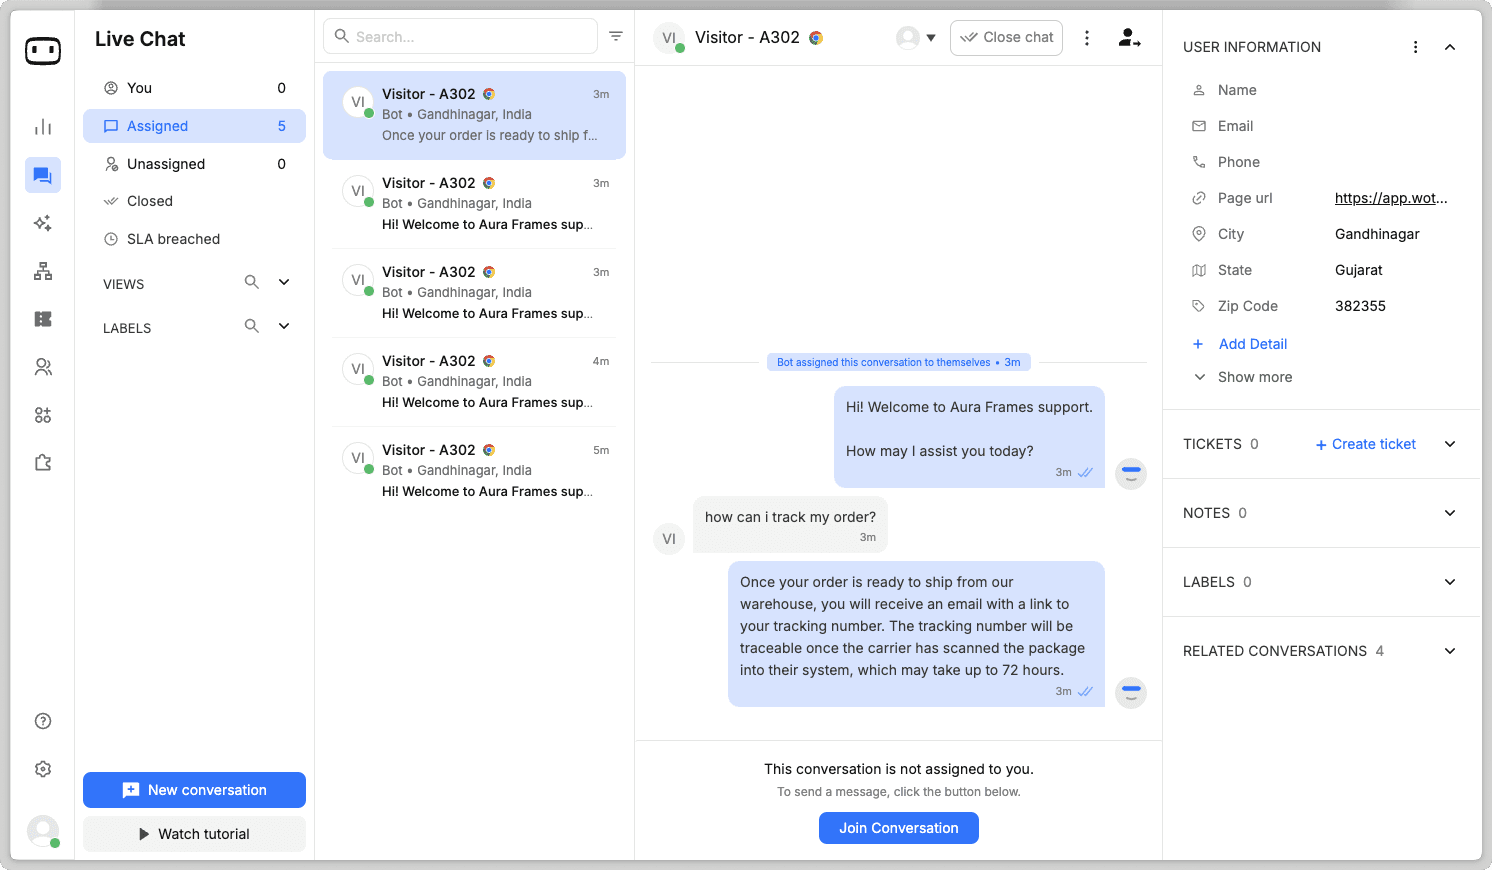
Also, it's best to collect user feedback for each response the AI agent offers.
Conclusion
We hope this guide has given you a clear understanding of how to build an AI agent and the key steps involved. By now, you should see the potential of an AI agent in automating tasks, improving efficiency, and enhancing customer interactions.
Take a moment to evaluate your business and identify areas where an AI agent could make a real impact. If you find a use case that fits, leverage a no-code AI agent development platform like WotNot to get started and improve the customer experience (CX) for your users.
If you need help evaluating the right AI agent strategy for your business, book a demo with us today!
ABOUT AUTHOR

Hardik Makadia
Co-founder & CEO, WotNot
Hardik leads the company with a focus on sales, innovation, and customer-centric solutions. Passionate about problem-solving, he drives business growth by delivering impactful and scalable solutions for clients.

Start building your chatbots today!
Curious to know how WotNot can help you? Let’s talk.
Start building your chatbots today!
Curious to know how WotNot can help you? Let’s talk.