
Chatbot /
8 Min read
How to Create a Chatbot From Scratch in 2023 [No Code]
December 1, 2022

Bhavyadeep Sinh Rathod
Content Editor, WotNot
By 2023, chatbots are projected to generate more than $100 billion in eCommerce transactions.
Not only this, but chatbots also help around 55% of businesses to generate high-quality leads.
These numbers indicate that chatbots have emerged as one of the best tools for automating operations in businesses worldwide. And in the coming years, you shouldn’t be surprised to see how the chatbot adoption rate gallops and new chatbot use cases emerge across industry verticals.
With such prominent signs of growth, it becomes important to have a chatbot at your disposal. This is the reason why many businesses are on a lookout to build a chatbot.
Here, many businesses have a perception that to create a chatbot, you require a lot of chatbot expertise and resources. But on the contrary, it is extremely easy to build a chatbot all thanks to the no code bot builder revolution.
Here, even a person from a non-technical background can easily create a chatbot of their own with simple drag and drop features. Interested to know how? Then keep reading this blog where we have shown a step-by-step guide to build a chatbot from scratch.
But before that, let’s have a look at the various stages that are involved to create a chatbot and the best practices that you must adopt for each stage.
1. Define a Use Case
The process of creating a chatbot starts with defining a use case. This first step is also one of the most important steps as it locks down the overall scope of your chatbot.
In simple words, choosing a use case is like laying the foundation of a tall structure. No matter how much effort you put into building a structure, if the foundation is not properly laid, it won’t stay put for long.
If we talk about it in the term “use case” for chatbots, it is an action that you can manage, model, and accomplish through conversational interaction between the bot and the user.
For example, automating appointment booking is a classic use case for the healthcare industry. Similarly, if you have an eCommerce business, you use cases are likely to be:
Persona-based product recommendations
Cart abandonment recovery
Shipment & Tracking
To choose a use case for your chatbot, you need to follow the below steps:
Calculate the ROI
Define Target Audience
Decide Your Chatbot’s Personality
2. Create a Rough Flow
Once the use case is ready, next you have to create a rough flow of your chatbot. You can draw this on a Microsoft Excel sheet, whiteboard, or even on paper.
We use Whimsical to create rough flow of our bots. You can have a look at a flow in the image below.
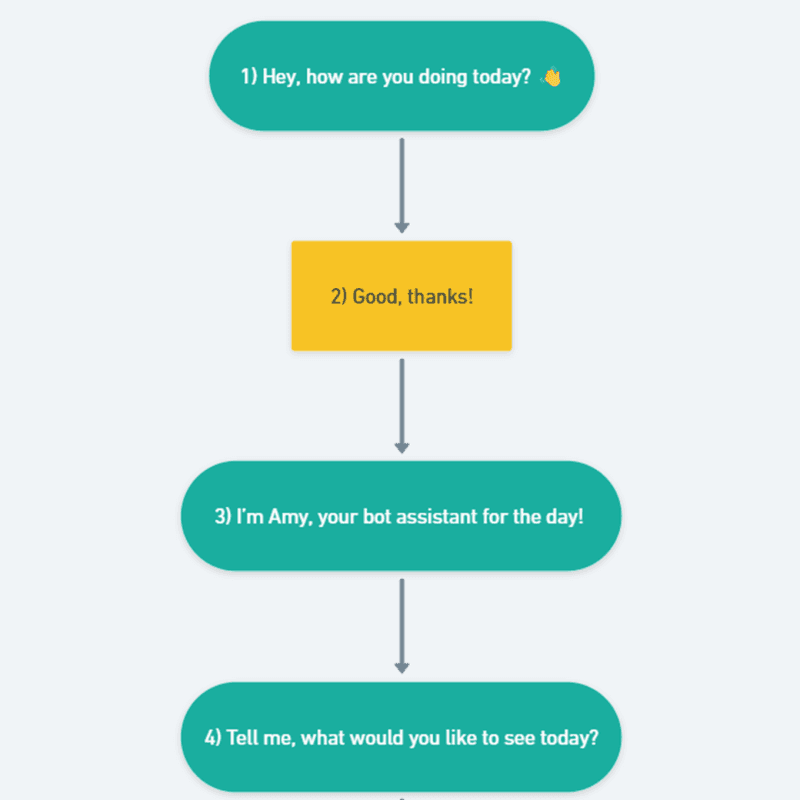
The purpose of this rough flow is to understand how the conversation would take shape and flow between your bot and the user.
This rough flow would also provide more clarity to other stakeholders, ensuring all of you are on the same page.
In addition, you can also review the content of the flow from a visitor’s perspective. This will help you to evaluate if your flow needs any rework or not.
3. Choose a Platform
There are several chatbot platforms available that you can choose from. Here are some of the most popular and widely used chatbot platforms. Most of these chatbots come with a set of common features and a set of unique features or you can say their USPs.
These features make some chatbot builders more suitable for enterprise businesses, whereas others are suitable for small and medium scale businesses. Similarly, some are extremely easy to use, whereas others are a bit difficult to get your hands on.
Here, the key is to identify the best chatbot platform that has all the required chatbot features to meet your business needs. To know more about the types of features you should look for in a chatbot, read this article.
4. Build the Bot
Once you have chosen the platform, the next step is to create a chatbot. Chatbot building on WotNot is simple, fast, and great fun. Although, if you create a chatbot on WotNot for the first time, you’ll need to be aware of the various action blocks and other functionality that comes within the bot builder.
To help you with it, we have listed a step-by-step guide to create a chatbot on WotNot.
4.1. A Step-by-Step Guide to Create a Chatbot From Scratch
For the sake of simplicity, we will build a lead generation chatbot for a marketing agency that provides email marketing, SEO services, and social media marketing services. The main objective here would be to collect details of prospective clients. Let’s have a look at the various steps for building a lead generation bot.
i. Create Your Account on WotNot
First, you need to create your account on WotNot. You can sign up for free by entering your details like name, contact number, email address, etc. You can also sign up directly through your Google account.
Once your account is created, you’ll be redirected to a page that will show various chatbot templates based on various use cases. But we will choose the “build from scratch” option since we want to create a chatbot from scratch.
ii. Choose the Trigger Rule
First, you have to decide when would this chatbot will actually show up? For this, you have to define parameters in the trigger action block. Here, you can define various options like:
Date Range
Languages
URLs
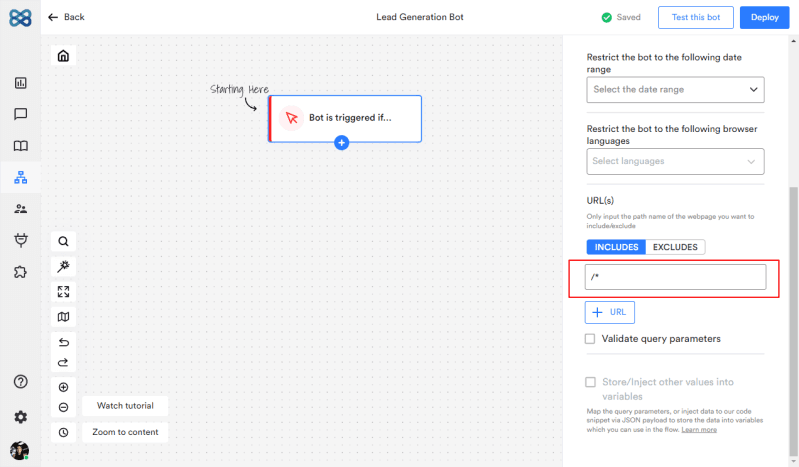
Here, we have added * to denote that all pages of the domain where we have added the WotNot script is where this chatbot is to be shown.
iii. Welcome Message
Once the chatbot shows up, it should start the conversation with a welcome message. Here, you can add a “send message” action block and add your welcome message.
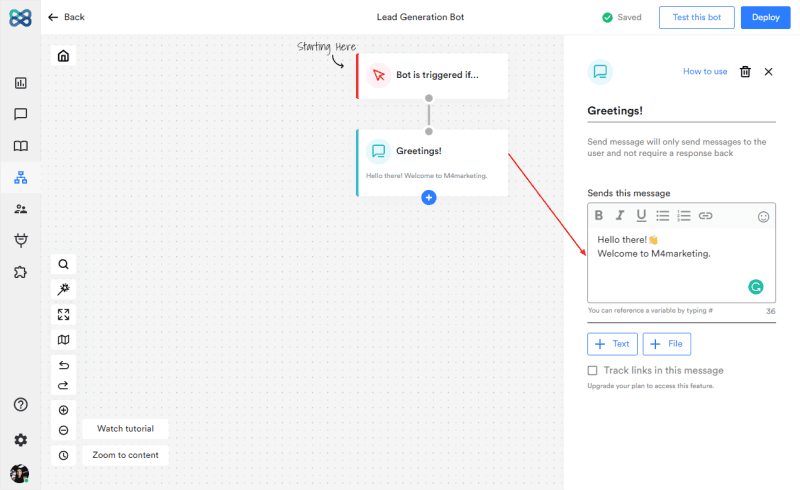
You can also make your welcome message more engaging by adding an image or a GIF in the message.
Here, we have added our welcome message as “Hello there! 👋 Welcome to M4marketing.”
iv. Know Your Customer’s Intent
A visitor could be on a website for multiple reasons. With a chatbot, you can find out their purpose and carry forward the conversation accordingly.
You can find out your customer’s intent with the use of buttons.
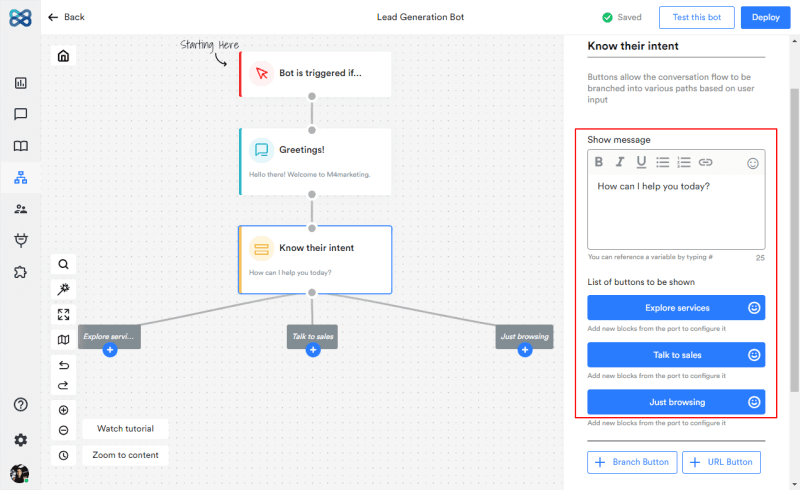
Here, in our example, we have added the “buttons” action block with three options that are:
Explore services
Talk to sales
Just looking to browse
Choosing any of the options would take the user down its defined path.
v. Showcase Your Services as Swipeable Cards
Let’s assume that the user chooses the “explore services” button. In this case, you’ll be required to show all your services.
Showcasing services as swipeable cards in a carousel is the best way since it allows you to:
Use a combination of text and image
Add a CTA
Add multiple cards occupying small space on the chat interface
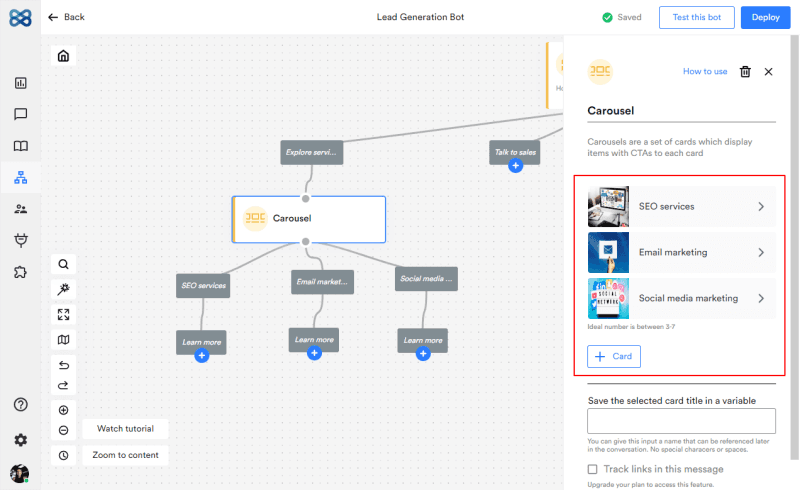
Here, we have added three cards:
Email Marketing
SEO Services
Social Media Management
Each has a CTA — “Learn more”
vi. Show Detailed Information About Services
Once the user chooses a service, you would like to offer some more information about the same. For this, you can use the “send message” action block and display all the relevant information about the service in detail.
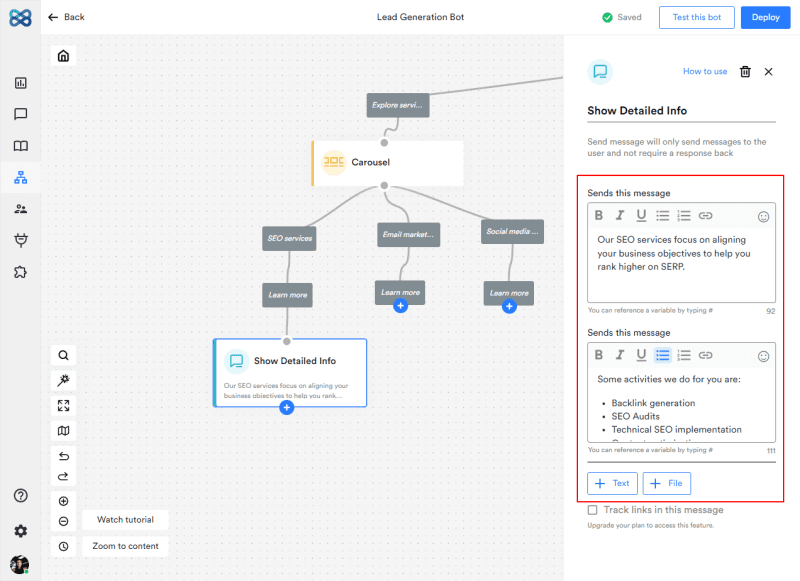
Refer to the image above to see how we have added some critical additional information about SEO services.
vii. Connect Them With the Team
After invoking interest in the user, you would want to capitalize on it. Here, connecting them with the team is a great opportunity to leverage this interest to capture key data and generate a lead.
You can connect your user with the team with the help of buttons. In this example, we have added a “buttons” action block that asks the question — “Would you like to discuss more on this with our expert?”
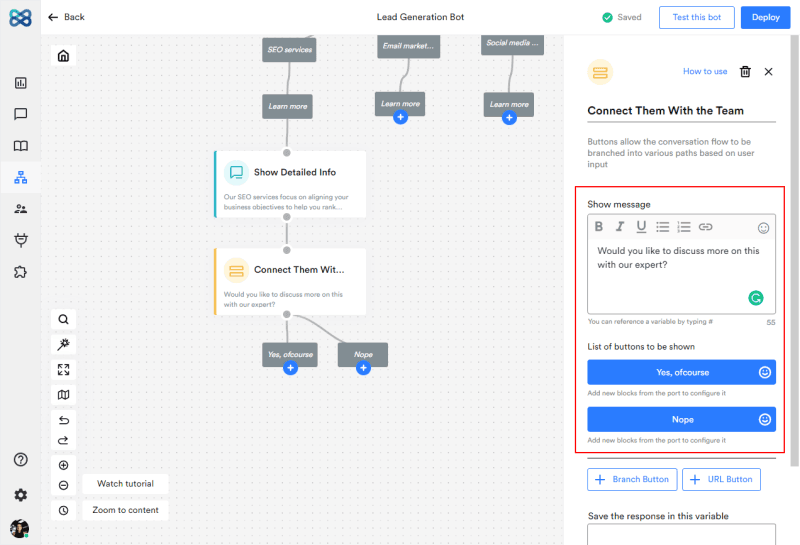
This question is followed by two options that are:
Yes, ofcourse
Nope
viii. Personalize the Conversation
Once the user chooses “Yes, ofcourse”, you can start asking qualifying questions. But before you start asking qualifying questions, it is important to build a rapport and a personal touch.
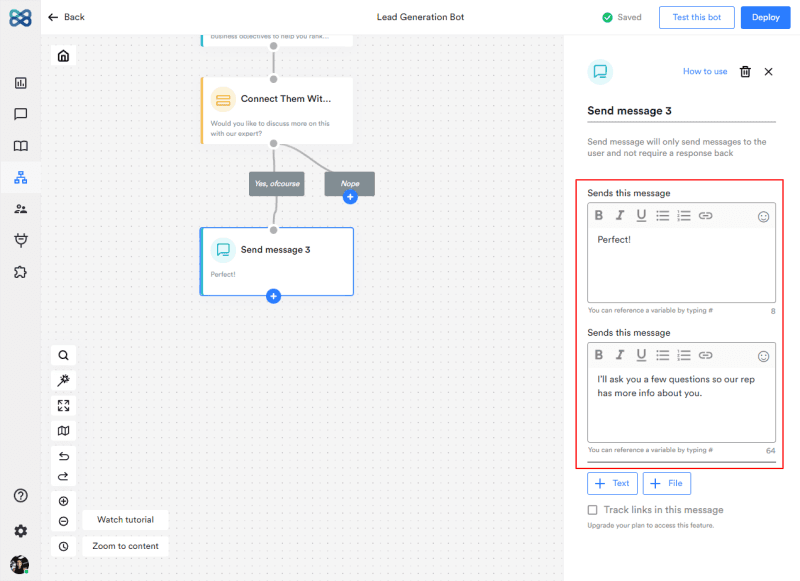
For this, you can ask the name of the user and then address them with their name to make the chat more personalized.
Here, we have added an action block to collect input which says “First, can I have your name?” After collecting the name, you can follow it up by sending a message that addresses them with their name.
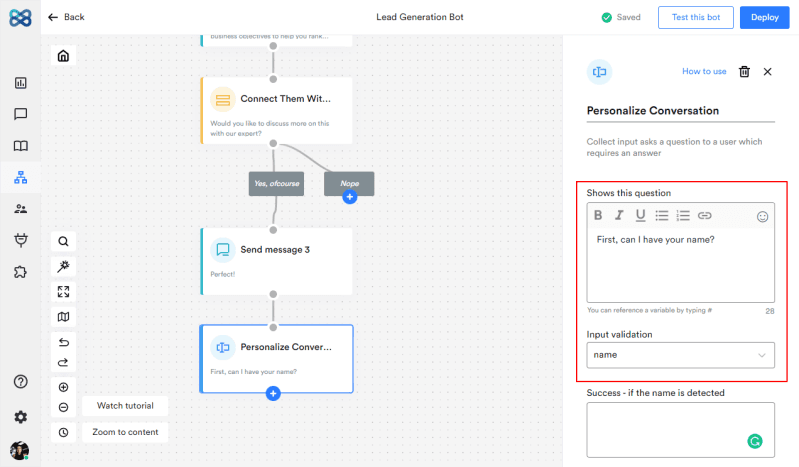
ix. Ask Them Their Expectation
After building a rapport with personalization, you can continue to carry forward the conversation to capture key details.
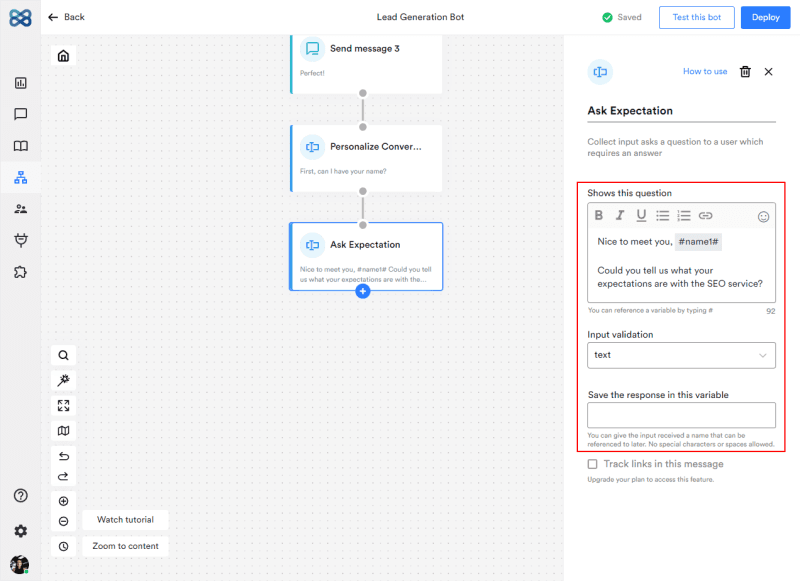
For starters, you can ask them their expectations. And then follow it up by asking when they want to get started with the services. Here, you can again use buttons to give them multiple options.
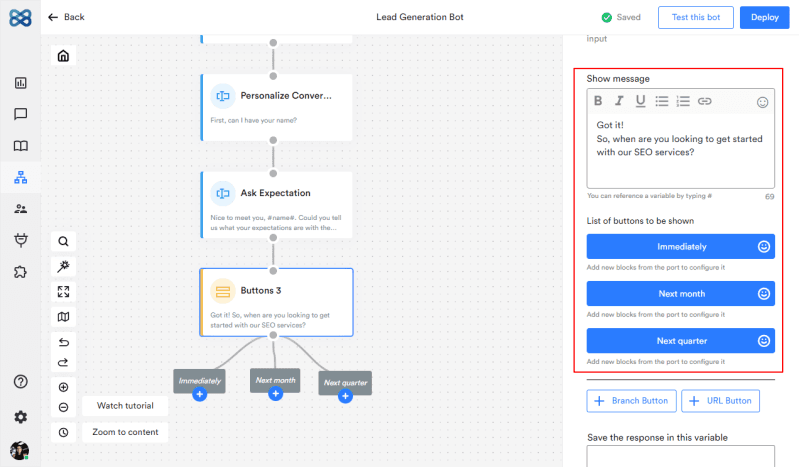
In our chatflow, we have used three buttons with options like:
Immediately
Next month
Next quarter
x. Go for the Bull’s Eye (Capture All Key Data)
When you reach a stage when you have managed to engage, build rapport, and make the conversation personalized for the user, it is time to go for the jackpot i.e., lead generating data.
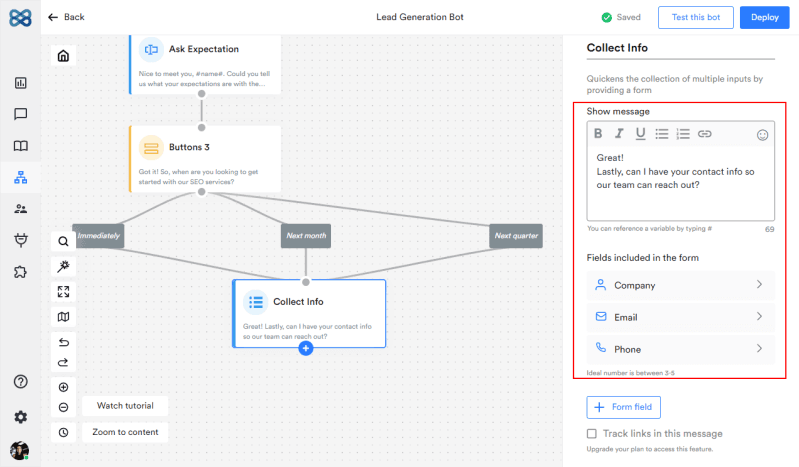
Adding a form is an easy way to do it. But here, you must ensure that the form doesn’t have more than three to four entries, otherwise it would defeat the purpose of using a bot.
Here, in our example, we have added three fields in the form which are:
Email
Phone
Company
You can add other fields depending on your business needs.
xi. Get Notified Every Time a Lead is Generated
For a lead generation use case, chatbots are not just limited to engaging users and collecting data. You can also use chatbots to get notified whenever a lead is generated.
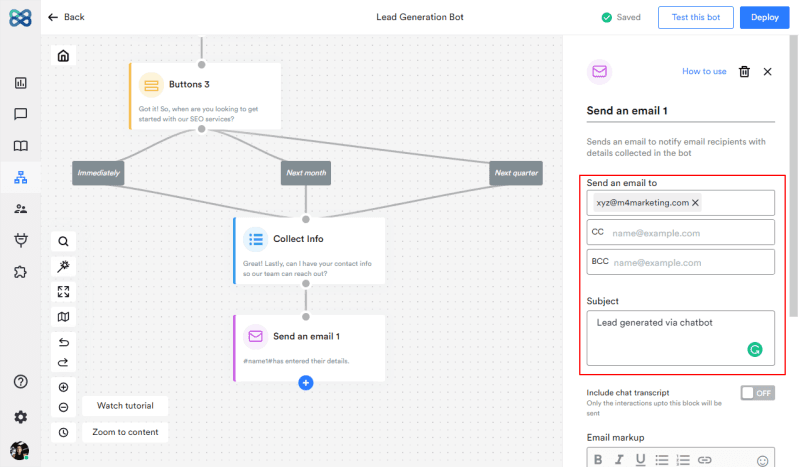
You can use the “Send an email” action block whose function is the same as its name. Here, you have to enter the email address where you want to receive the notification address. Moreover, you can also add the subject line and customize the body of the email as per your choice.
So, everytime a user fills the form, you will get a notification email about the same.
Alternatively, you can use Google Sheets integration and native CRM integrations to get notified about every lead.
xii. End the Conversation
After getting all the required information, lastly you want to end the conversation with grace and politeness. Here, you must ensure that the ending message doesn’t cause any confusion for the user. It must be precise and clear.
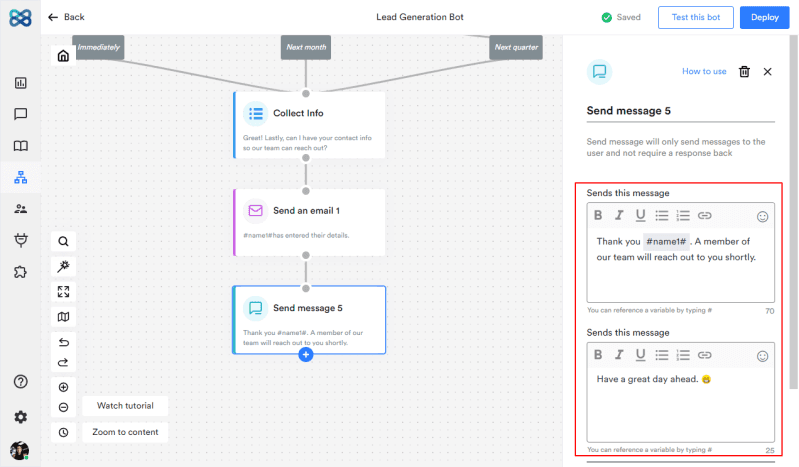
In our flow, the ending message says “Thank you, Peter Parker, a member of our team will reach out to you shortly. Have a great day ahead.”
5. Test, Run, and Iterate
So, now that we have completed entire flow of the chat. Let’s test to see how it looks.
Perfect! The chatbot works exactly how we intended it to.
You see, how easily and quickly we were able to create a flow for a lead generation chatbot. Similarly, you can also build your lead generation chatbot by using various action blocks and easy to use bot builder interface of WotNot.
Once you have successfully created the bot, the best practice then is to run the mock to see if everything is working as expected, just the way we did now.
In addition, you can also involve other stakeholders and departments in the review to ensure that everyone is on the same page.
To get an objective perspective, you can hire a team of professional testers and reviewers who can give their feedback.
Now that you have collected all the feedback and potential loopholes, the next step is to fix them and test that again. You have to repeat this process until your chatbot flow is devoid of any loopholes. Once you achieve it, you can finally implement it.
Conclusion
So, did your perception change about chatbot building? I am sure this blog must have broken down all the myths that say bot building is a complex task. Now that you know how easy it can be to create a chatbot, why don’t you create your first bot on WotNot? Sign up now and start building bots!
And if you have any queries, contact us or schedule a demo.
ABOUT AUTHOR
Bhavyadeep Sinh Rathod
Content Editor, WotNot
He likes technology, chatbots, comedy, philosophy, and sports. He often cracks hilarious jokes and lightens everyone's mood in the team.


