
13 min read
WotNot Partners with Dialogflow

Hardik Makadia

Let’s build your chatbot today!
Launch a no-code WotNot agent and reclaim your hours.
*Takes you to quick 2-step signup.
Sometimes bots end up having a boring conversation; the same questions being asked repeatedly, no answers or redundant answers making the conversation uninteresting. WotNot is on a mission to change this! And as a part of this, we are now introducing a completely no-code AI chatbot that not only answers questions but makes sure to answer them intelligently!
WotNot has always been an efficient no-code chatbot that doesn’t need you to learn coding to make a bot. But with a partnership with Google Dialogflow, WotNot now offers Natural Language processing. This means that your company can now implement AI without the help of any other IT service provider. This blog will help you learn how to configure AI, configure chatbot and eventually place it on your website to provide intelligent answers to your customers.
Introducing Dialogflow
Previously known as API.AI, Dialogflow was acquired by Google in 2016. Dialogflow lives by its name, providing a seamless flow of natural dialogues between humans and machines. Being a part of the Google product clan also means easy integration of Dialogflow into your current Google tech system like Google Cloud Platform, Google Digital Garage, Google Business Messages, and Google Marketing Platform. The uniqueness of Dialogflow lies in its Natural Language Understanding (NLU) capability. NLU is an integral component of NLP that helps understand the intent and provide accurate responses to the user query.
Source: Google Cloud
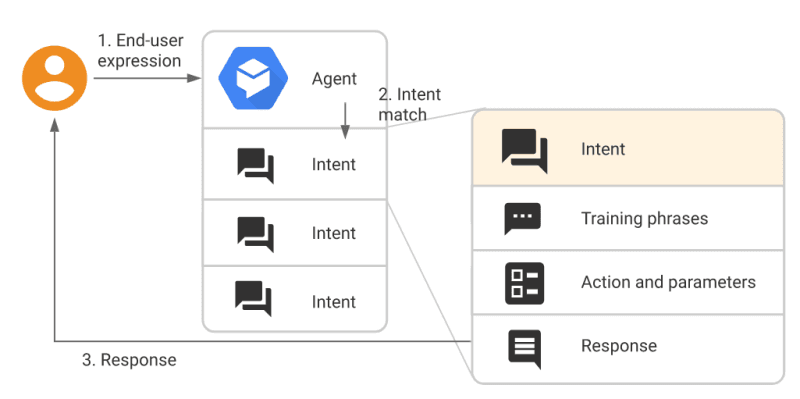
Before we dig deep into the example of how Dialogflow and WotNot can help you, let me start by charting out the basic infrastructure and terminology for using Dialogflow. So Dialogflow or any NLP engine that processes the Natural Language of your website visitor has four major components. Let’s take a look at them using a small example.
Let’s say you own a ticketing platform for a movie theatre. Now a visitor might come and ask a question about the show-timings of a specific movie or the ticket prices of a particular film, or the physical location of the theatre. All these three things signify the intention of what your visitor wants to know. Dialogflow recognises these intentions as ‘intent’. In this situation, your intents would be
Pricing
Timings
Location
But now the problem is your visitor might ask this question in different forms. If they want to know the timings, they can phrase it as
What are film timings?
Show timings of the movie
Time slot for the film
What are the show timings of the film?
What timings are available for this movie?
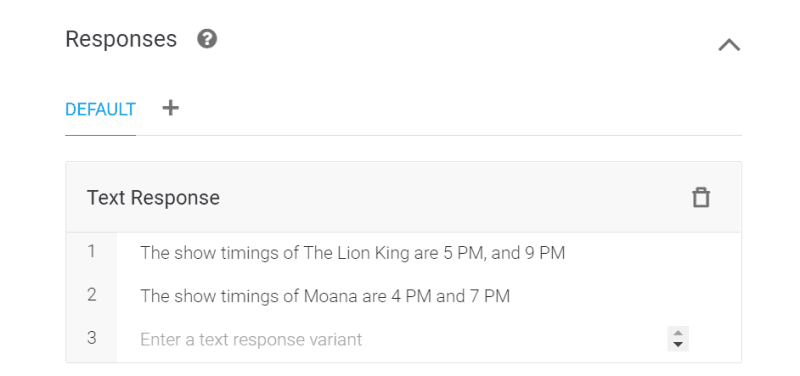
These questions are called ‘Training Phrases’. Think of it as if you are training a kid. You tell that kid that no matter how this question is asked, the question has only one intention: to know the timing. Then you train the kid that whenever the question around timing is asked, you need to respond by telling that, ‘the show timings of the movie are 5 PM and 9 PM.‘
This is called the ‘Response’. After a while, the kid will learn how to identify intents based on specific works. Such as whenever the question asked has the term “time” or “slot” in it, the intent is always timing. These smaller pieces that help this engine identify the intent are called ‘Entities.’
Let’s build your chatbot today!
Launch a no-code WotNot agent and reclaim your hours.
Let’s build your chatbot today!
Launch a no-code WotNot agent and reclaim your hours.
How to set up Dialogflow Agent?
So this part of the blog will help you create a Dialogflow agent, add intents and training phrases and create responses you would like to give. Basically, think of this process as setting up the intelligent brain of your chatbot. Here, we would be taking an example of a movie ticketing company.
1. So, first things first, you need to understand how to use Dialogflow.
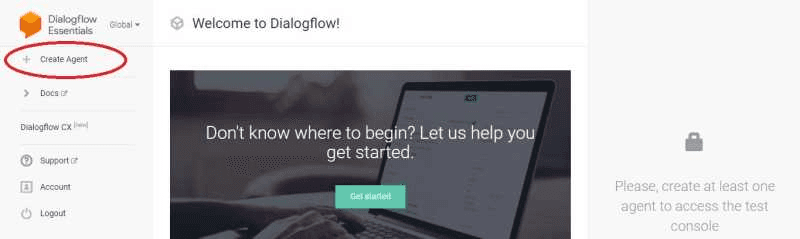
Step 1- Create an Account
Click on ‘go to console’ on the top right corner
Sign in using your Gmail Account

Step 2- Create an Agent
Go to the top left corner and click on ‘Create Agent.’
Once you click on ‘Create Agent,’ you can give a name to your agent. As a Movie Ticketing company, I have named the agent ‘MovieInfoBot’. Choose your required language as Dialogflow supports building bots in 20 languages. In our example, I have chosen English.
Think of the agent as a single bot where you will build its database with multiple intents and utterances.
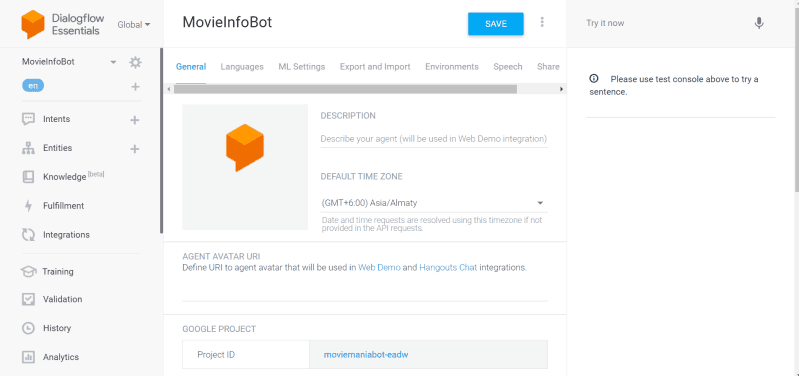
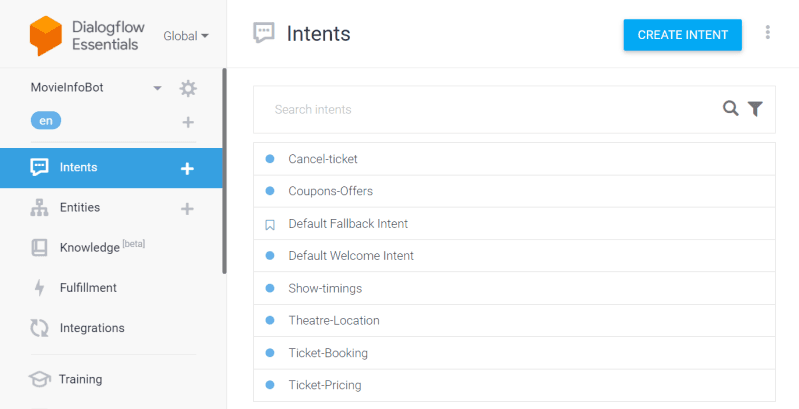
Once you create the agent, you’ll find many options open up on the navigation bar on the left. You can now create multiple intents and entities for your MovieInfo Bot.
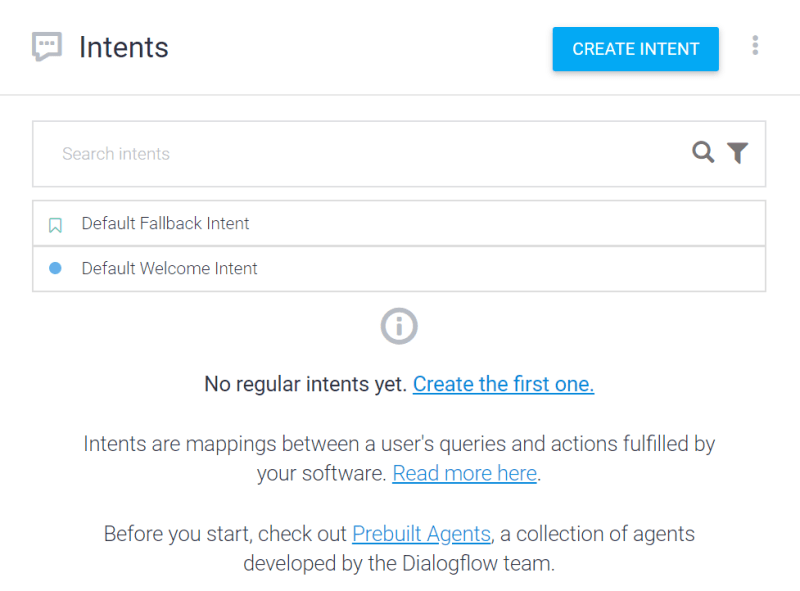
Step 3- Create Intents
Click on ‘Intent’ on the navigation bar on the left side. Dialogflow has already developed a Default welcome intent.
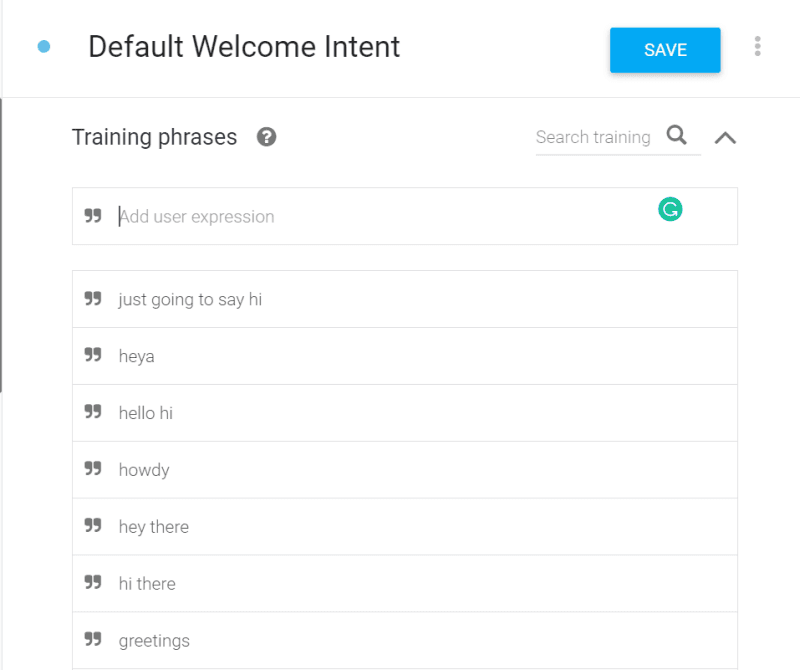
Dialogflow has also developed responses to these phrases.
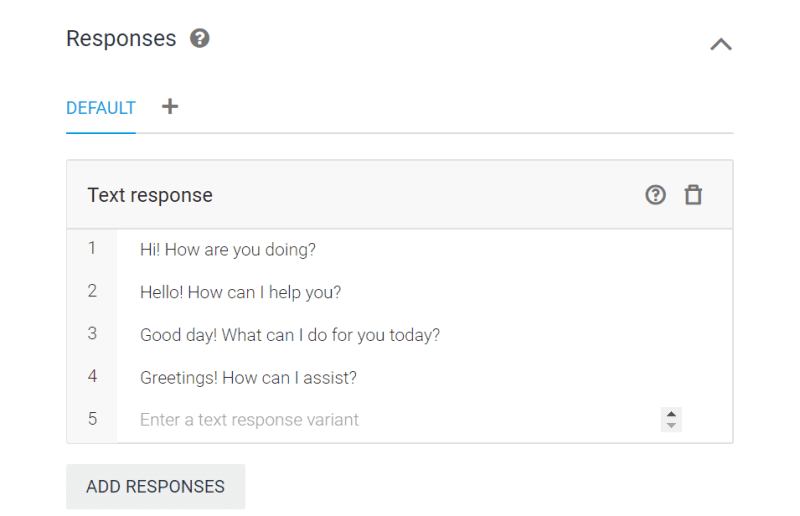
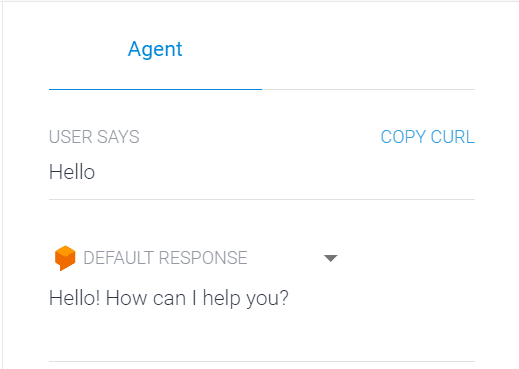
If you use these default intents and responses, your bot will look like this:
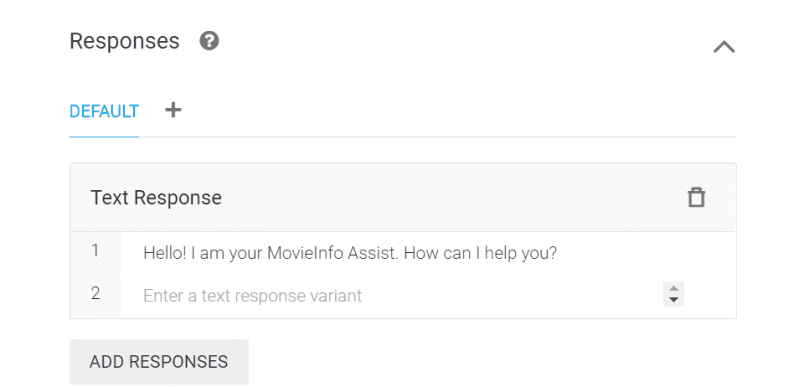
If you want to add a customised welcome message for your bot, you can do that too. Just go to add responses and type your message, “Hello, I am your Movie Info Assist. How can I help you?”. You can delete all the default responses and just keep your customised response if the user types hello.
Note: Always remember to save your actions!
Click on ‘Save’ to proceed further to create the following intent. Look for the green signal to ensure your intent was saved.
Now that you have created the welcome intent let’s make other intents for a movie ticketing company that your bot can respond to. To do so, you can click on the ‘+’ sign.

Create other intents to assist users with their queries such as ‘Show-Timings’, ‘Ticket-pricing’, ‘Discounts & Offers’, ‘Get-Feedback’, ‘Online-Booking’, ‘Cancel-ticket’.
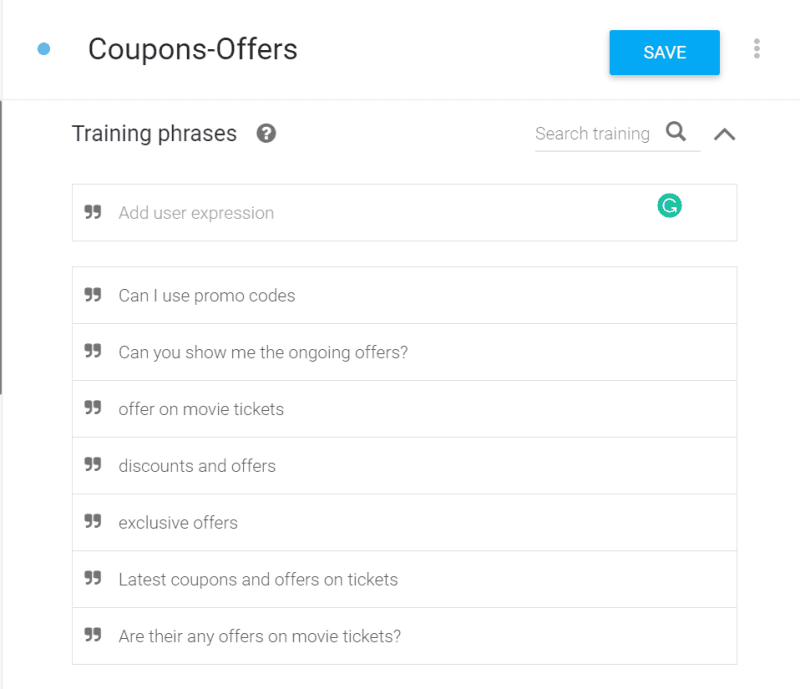
Add expressions and responses for every intent. In this case, there can be various utterances for asking for offers and discounts. I have grouped these under ‘Training Phrases’ as shown below.
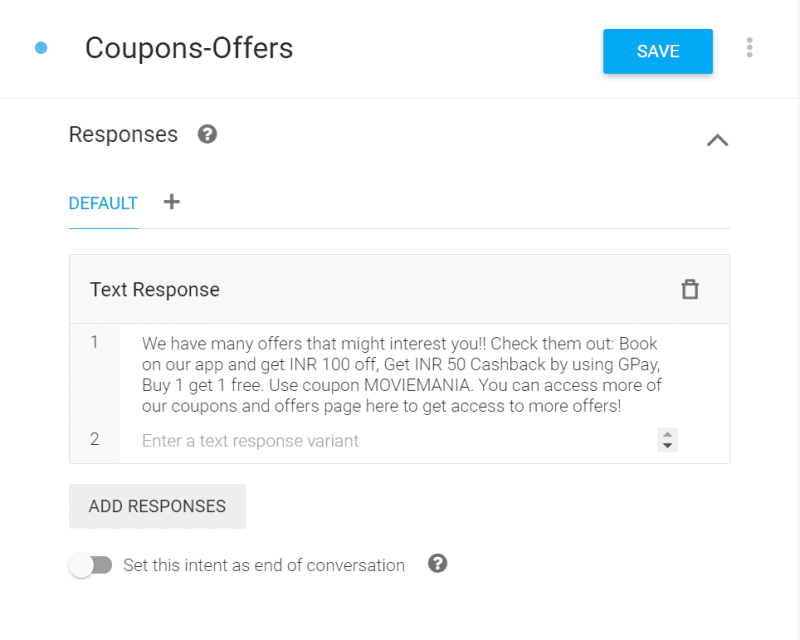
After adding the intents, add all your responses to those intents. You can also add multiple responses for a single intent. In this case, your agent will select a response at random. Your agent can also give responses based on the parameters and actions, which we’ll discuss in detail further. The basic response type is a text response. Other types of responses are available (image, audio, synthesised speech, and so on), some of which are platform-specific.
Step 4: How to use entitles, actions, and parameters
To make your AI chatbot more specific, you need to add entities to have accurate conversations. Let me take you to our example of a movie ticketing company. Like I mentioned before, one of the intents it will have is ‘Show-Timing’. An entity allows the agent to recognise more specific keywords in the query. In case the intent is show-timing, the entity here can be ‘Movie Name’. Let’s understand in detail how we use entities.
Click on the ‘entity’ on the navigation bar on the left side.
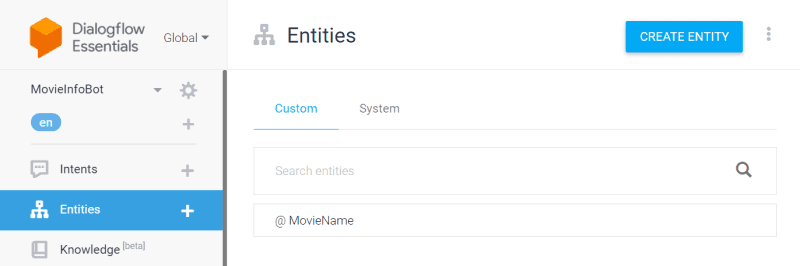
Add the values of the entity. In this case, I have added movie names that the theatre is showing.
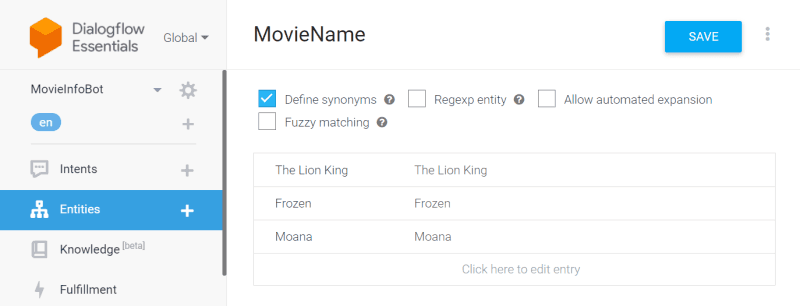
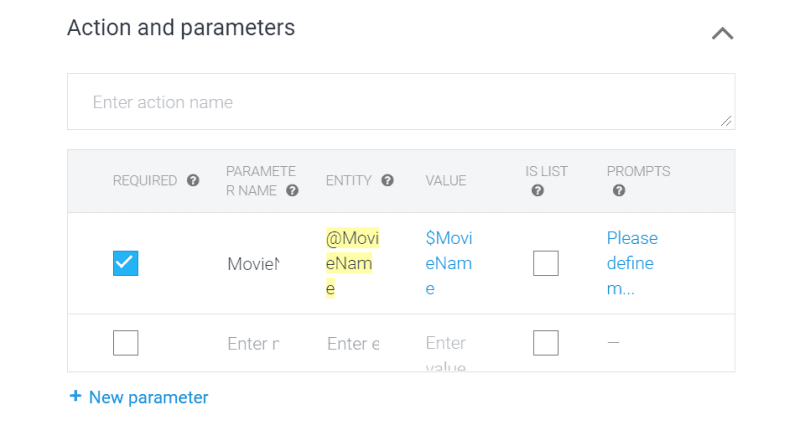
In entities, add your entity name starting with the ‘@’ symbol. Enter corresponding ‘Value,’ beginning with the ‘$’ sign, and check the ‘Required’ box to enable ‘Prompts.’
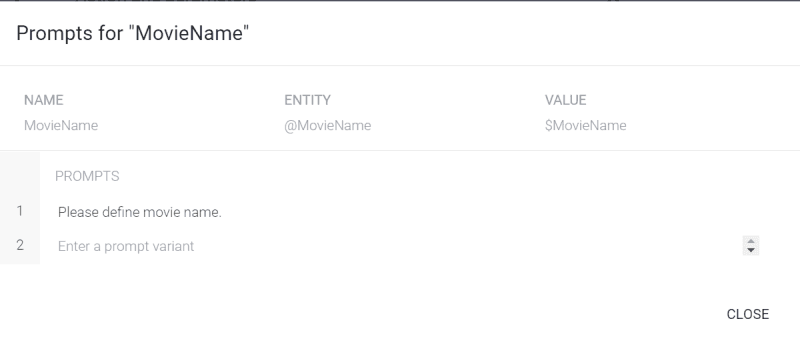
Prompt asks the user to be more specific. In this case, it asks the user to enter the movie name to know the show-timings.
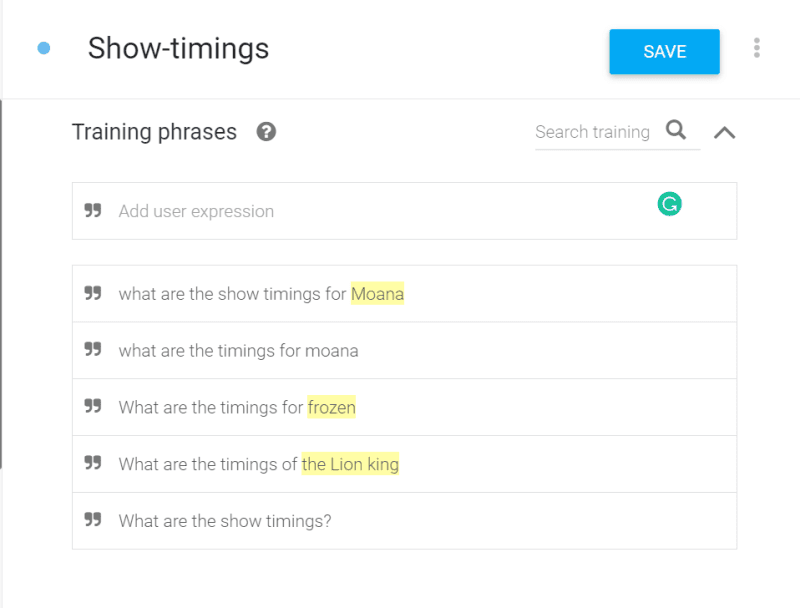
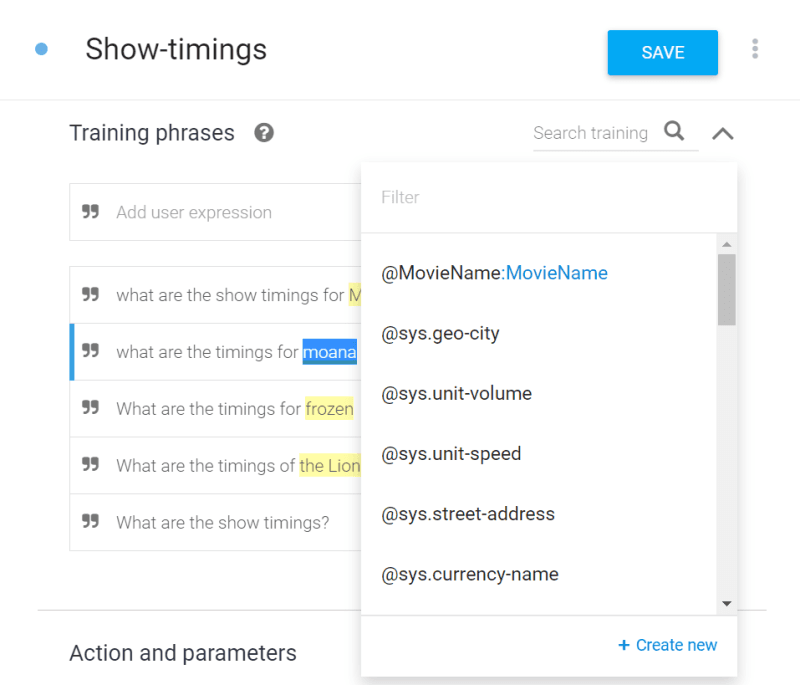
Now that you add the training phrases, Dialogflow will automatically detect the entity, as shown below. If not detected, you can right-click on the training phrases to manually detect them.
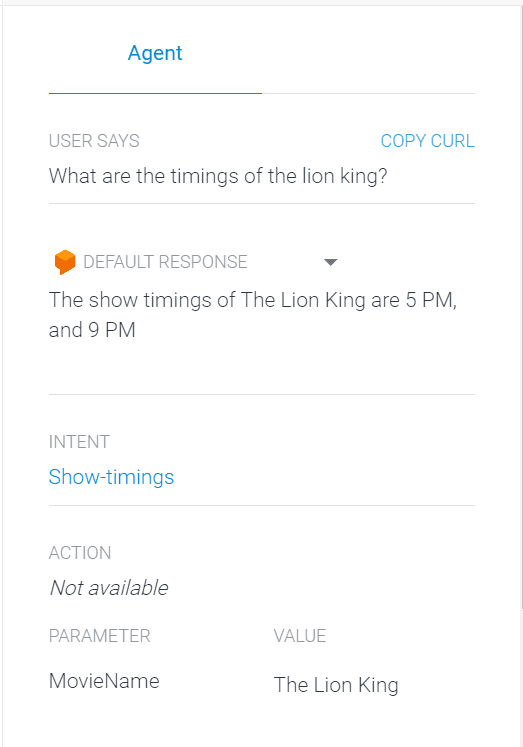
Add the prompts for all parameters. Finally, add the responses to your intent, including a concluding response.
Save your agent, and test your conversation flow. In this case, the final flow will look like this:
Just like how you created this intent, you develop all the intents with training phrases and responses.
Remember, a higher number of intents and training phrases allows the agent to understand the user query smartly and respond accurately. Your job is to develop the correct number of intents and utterances, which are the core components for getting responses.
2. Generate API Key and Create a JSON File
Since we are using two platforms to build an AI bot, we need a key to connect those two platforms. With Dialogflow, you have created the brain of your AI Chatbot, and with WotNot, you will build the face. But to connect the brain to the face, you need an API key that will call the Dialogflow agent in the WotNot Bot builder. To generate this API key, you first go to the Google Cloud Console here: https://console.cloud.google.com/.
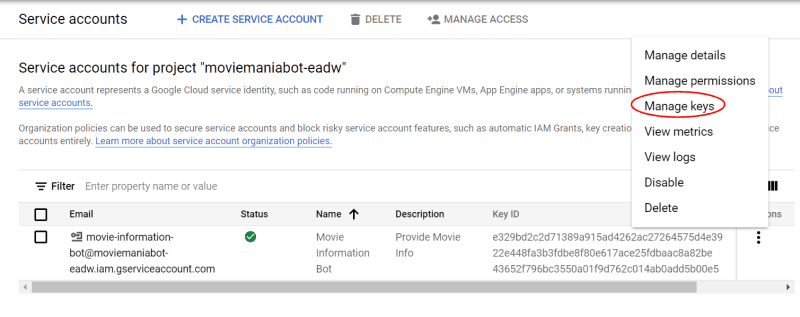
Click on ‘IAM & Admin’ on the left side navigation bar and go to ‘Service Accounts.’

Once you’re directed to ‘Service Accounts’, click on ‘actions’ and go to ‘Manage Keys.
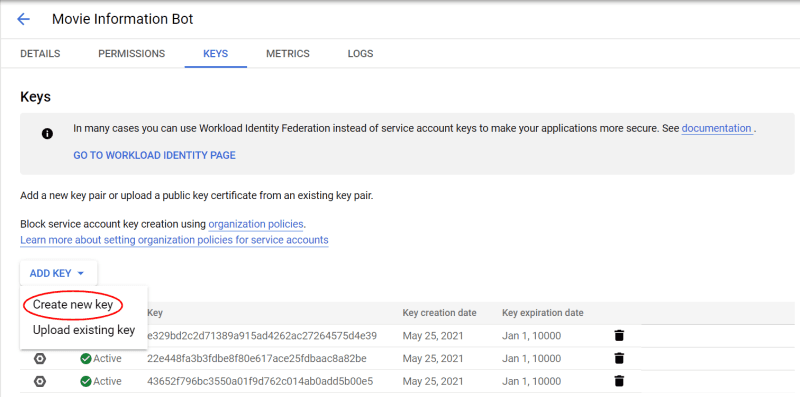
Click on ‘Create New Key’ as shown below
Choose ‘JSON,’ and click on ‘Create.’
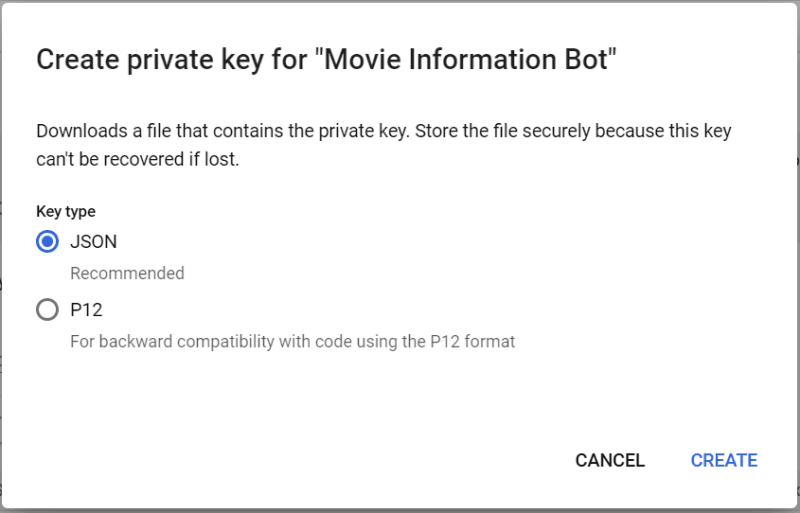
Once you click on ‘Create,’ a JSON file will be downloaded.
Start building, not just reading
Build AI chatbots and agents with WotNot and see how easily they work in real conversations.

Start building, not just reading
Build AI chatbots and agents with WotNot and see how easily they work in real conversations.
Start building, not just reading
Build AI chatbots and agents with WotNot and see how easily they work in real conversations.

Dialogflow and WotNot – Adding the ‘AI’ to ‘Chatbot’
Let’s assume you’ve built an advanced NLP bot using Dialogflow. What now? How do you deploy it on your desired channel? It’s simple- using WotNot. Let me elaborate. Dialogflow provides you with an intelligent NLP engine which is its USP. The engine understands what the question is and figures what should be the answer. But it isn’t easy to add a Dialogflow bot on your website directly since they do not have their own interface to develop a bot. This is where WotNot comes in.
WotNot provides you with the infrastructure that helps you build chatbots using a no-code drag and drop builder where you can easily connect your Dialogflow agent to the bot. You can call multiple Dialogflow agents on your bot to develop a full-fledged AI bot. Using Dialogflow with WotNot also allows you to build hybrid bots that combine a rule-based flow with AI. It helps you expand your conversational flow by adding other questions to the script and make the flow engaging.
Now that you’ve built the AI chatbot flow on Dialogflow, you need to integrate it on WotNot using the JSON file. Follow the below steps to build a bot on WotNot.
Step 1: Sign up to WotNot from here and go to the bot builder.
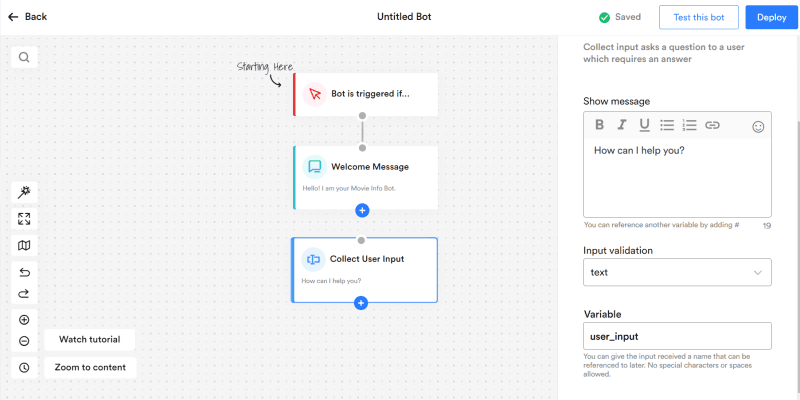
Step 2: Start the flow by adding the first block of ‘Welcome Message.’ Add a ‘Collect Input’ action block that asks the user query. Add the response as a variable to store it and name the variable as ‘user_input.’ This is to pass the customer query to Dialogflow to get a response.
Step 3: Add a Dialogflow Action Block. Add the ‘user_input’ as the variable and upload the JSON file you downloaded previously.
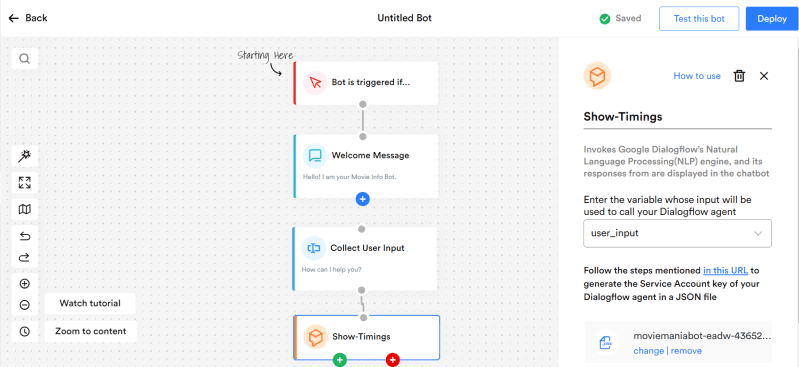
Step 4: The Dialogflow Action Block has two action points. The green button allows two options: To add another action block to take the conversation forward, and the self-loop, which permits the user to ask other questions, the responses of which can be fetched from Dialogflow.
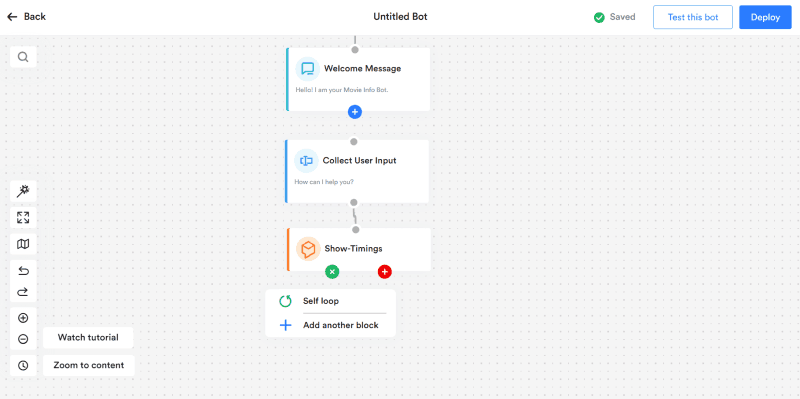
In the red button, you need to add a failure message if Dialogflow doesn’t recognise the intent and ask the user to rephrase.
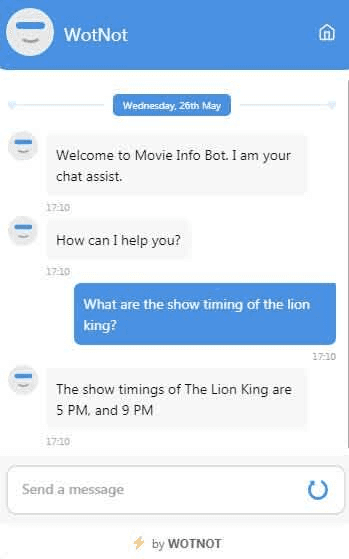
Step 5: Test your Bot.
Click on ‘Test the Bot’ and check to see if the bot answers as per expected behaviour. If it isn’t, recheck all the steps on Dialogflow and WotNot and make the necessary changes.
Similarly, you can create multiple Dialogflow agents within your bot.
Reap WotNot benefits while using Dialogflow!
An Ai chatbot has many use-cases across different industries such as
Booking tickets for events/shows
Answering customer questions
Online food delivery
Personalized product recommendations for eCommerce customers
Confirm orders and Track Shipping
Collecting Customer Feedback
Booking for flights and hotels
A lot of companies are already upping their game through conversational AI. The demand for advanced chatbots is increasing because of their ability to have authentic conversations with the end-user, and revolutionising customer communication as we know it. If you’re looking to be a part of this revolution, and should you feel the need to get an AI bot, we are happy to get you on board with its adoption. The launch of WotNot’s integration with Dialogflow will greatly help cover companies’ requirement to build cutting edge intelligent bots, be it for small businesses or large corporates. If you’re looking to optimize your customer communication on your platforms, get in touch with us, and we can assist you every step of the way!
ABOUT AUTHOR
Hardik Makadia
Co-founder & CEO, WotNot
Hardik leads the company with a focus on sales, innovation, and customer-centric solutions. Passionate about problem-solving, he drives business growth by delivering impactful and scalable solutions for clients.

Start building your chatbots today!
Curious to know how WotNot can help you? Let’s talk.
Start building your chatbots today!
Curious to know how WotNot can help you? Let’s talk.


